Mouse Embroidery
I started my mouse embroidery square while I was at Exeter Craft Festival in July this year. I knew it would be a ‘mice’ little project (sorry couldn’t help it) for those quiet times during events. I actually didn’t manage to stitch that much at the festival and ended up cutting out most of what I did stitch…. But that is the great thing about embroidery, its so easy to pick up and put down and anything you’re not happy with can be re-stitched or stitched over.
Just a quick note: Since stitching these mice, I’ve updated my embroidery panels. While the new panels are no longer hand-printed, the design remains similar (just the outline). You can still use this blog as a guide for stitching it, and the links now direct to the updated version of the design.

A mouse embroidery square waiting to be stitched.
So, if you have only just discovered my embroidery squares….hi! I have printed these squares using my designs that I normally print in colour and sew into lavender bags and other goodies. But one day, I fancied having a go at embroidering a design…..and that was it, my embroidery squares became a thing. I print the embroidery squares in grey, so that you can choose your favourite thread colours and combinations. I also don’t provide any instructions for how to stitch your square, so that you can use your favourite stitches and add as many or little details as you like. I do know though, that although I love to ‘do my own thing’ with projects like this, some of you find it very useful to have a guide. So as I’m working my way through all my designs, I have been writing up how I stitched mine as a guide to help you. You are more than welcome to stitch yours exactly as I have done but also take the bits you like and dismiss the bits you don’t…..change the colours, change the stitches, change the amount of threads, make it yours, play around and enjoy!
Note: This post is based on my original hand-printed panels, but the new versions still feature the same fieldmice outline!
I sell the embroidery squares on their own, which makes them perfect for those of you who already have a box of threads. But if you’re new to embroidery and don’t yet have a stash, I sell thread sets, hoops and needle packs in my shop to get you started. The thread sets are colour palettes that I have put together, they aren’t assigned to any particular embroidery square design so you can have fun choosing what to stitch in what colour knowing that all of the colours in that thread set will look wonderful together.
One of the first things I like to do before anything else, is to pick out my threads. I tend to lay them out on the square roughly where I intend to use them to help me visualize, but nothing is ever set in stone and I often switch some out throughout the project and add some extras in. The hardest part for me with this one was deciding the colours of my mice. In my original design they are raspberry, and after printing them in that colour for so long I really struggled to see them in any other colour. But this just made me more determined to stitch them in another colour……I went with purples. Once I’ve settled on the main event colours the other colours fall into place easier for me.

My thread selections for this project.
This is the list of colours that I used. I’ve used a mix of Anchor and DMC threads, they are the thread brands that I like to use. I really like the quality and like how they stitch.
Anchor 104 – Light purple
Anchor 107 – Mid purple
Anchor 106 – Dark purple
Anchor 379 – Light brown
DMC 783 – Golden yellow
Anchor 371 – Brown
Anchor 401 – Charcoal
I used these 5 stitches in this project. They are more ‘basic’ stitches but I do like to play around with mixing colours and layering to add interest. You absolutely don’t need to do that though……your mice will still look wonderful and cute if you stitch them in one colour and use less stitch types.
Long & Short Stitch
Split Stitch
Straight Stitch
French Knots
Backstitch

My mouse embroidery square ready for stitching.
So lets gets started….
First things first. Pop that embroidery square into your hoop. Pull the fabric all the way around and tighten the hoop hardware so that your embroidery square is drum tight. This tension will help to make your stitches neater and can also prevent puckering in the spaces between stitches.
I began stitching the wheat. But here’s a confession……I just did not like how I did it. Originally I stitched the wheats with lazy daisies and then used a stem stitch for the stalks. For me, there was something off about it. But I couldn’t put my finger on it. So I left it while I stitched the mice to see if it would grow on me. It didn’t. So I did cut it out eventually but you will see glimpses of the original wheats in some of the pictures. Here is the original stitching of my wheat…..just in case you wanted to see what the lazy daisy stem stitch combo looked like.

My original attempt at stitching the wheats. I decided to cut this out eventually and stitched it another way.

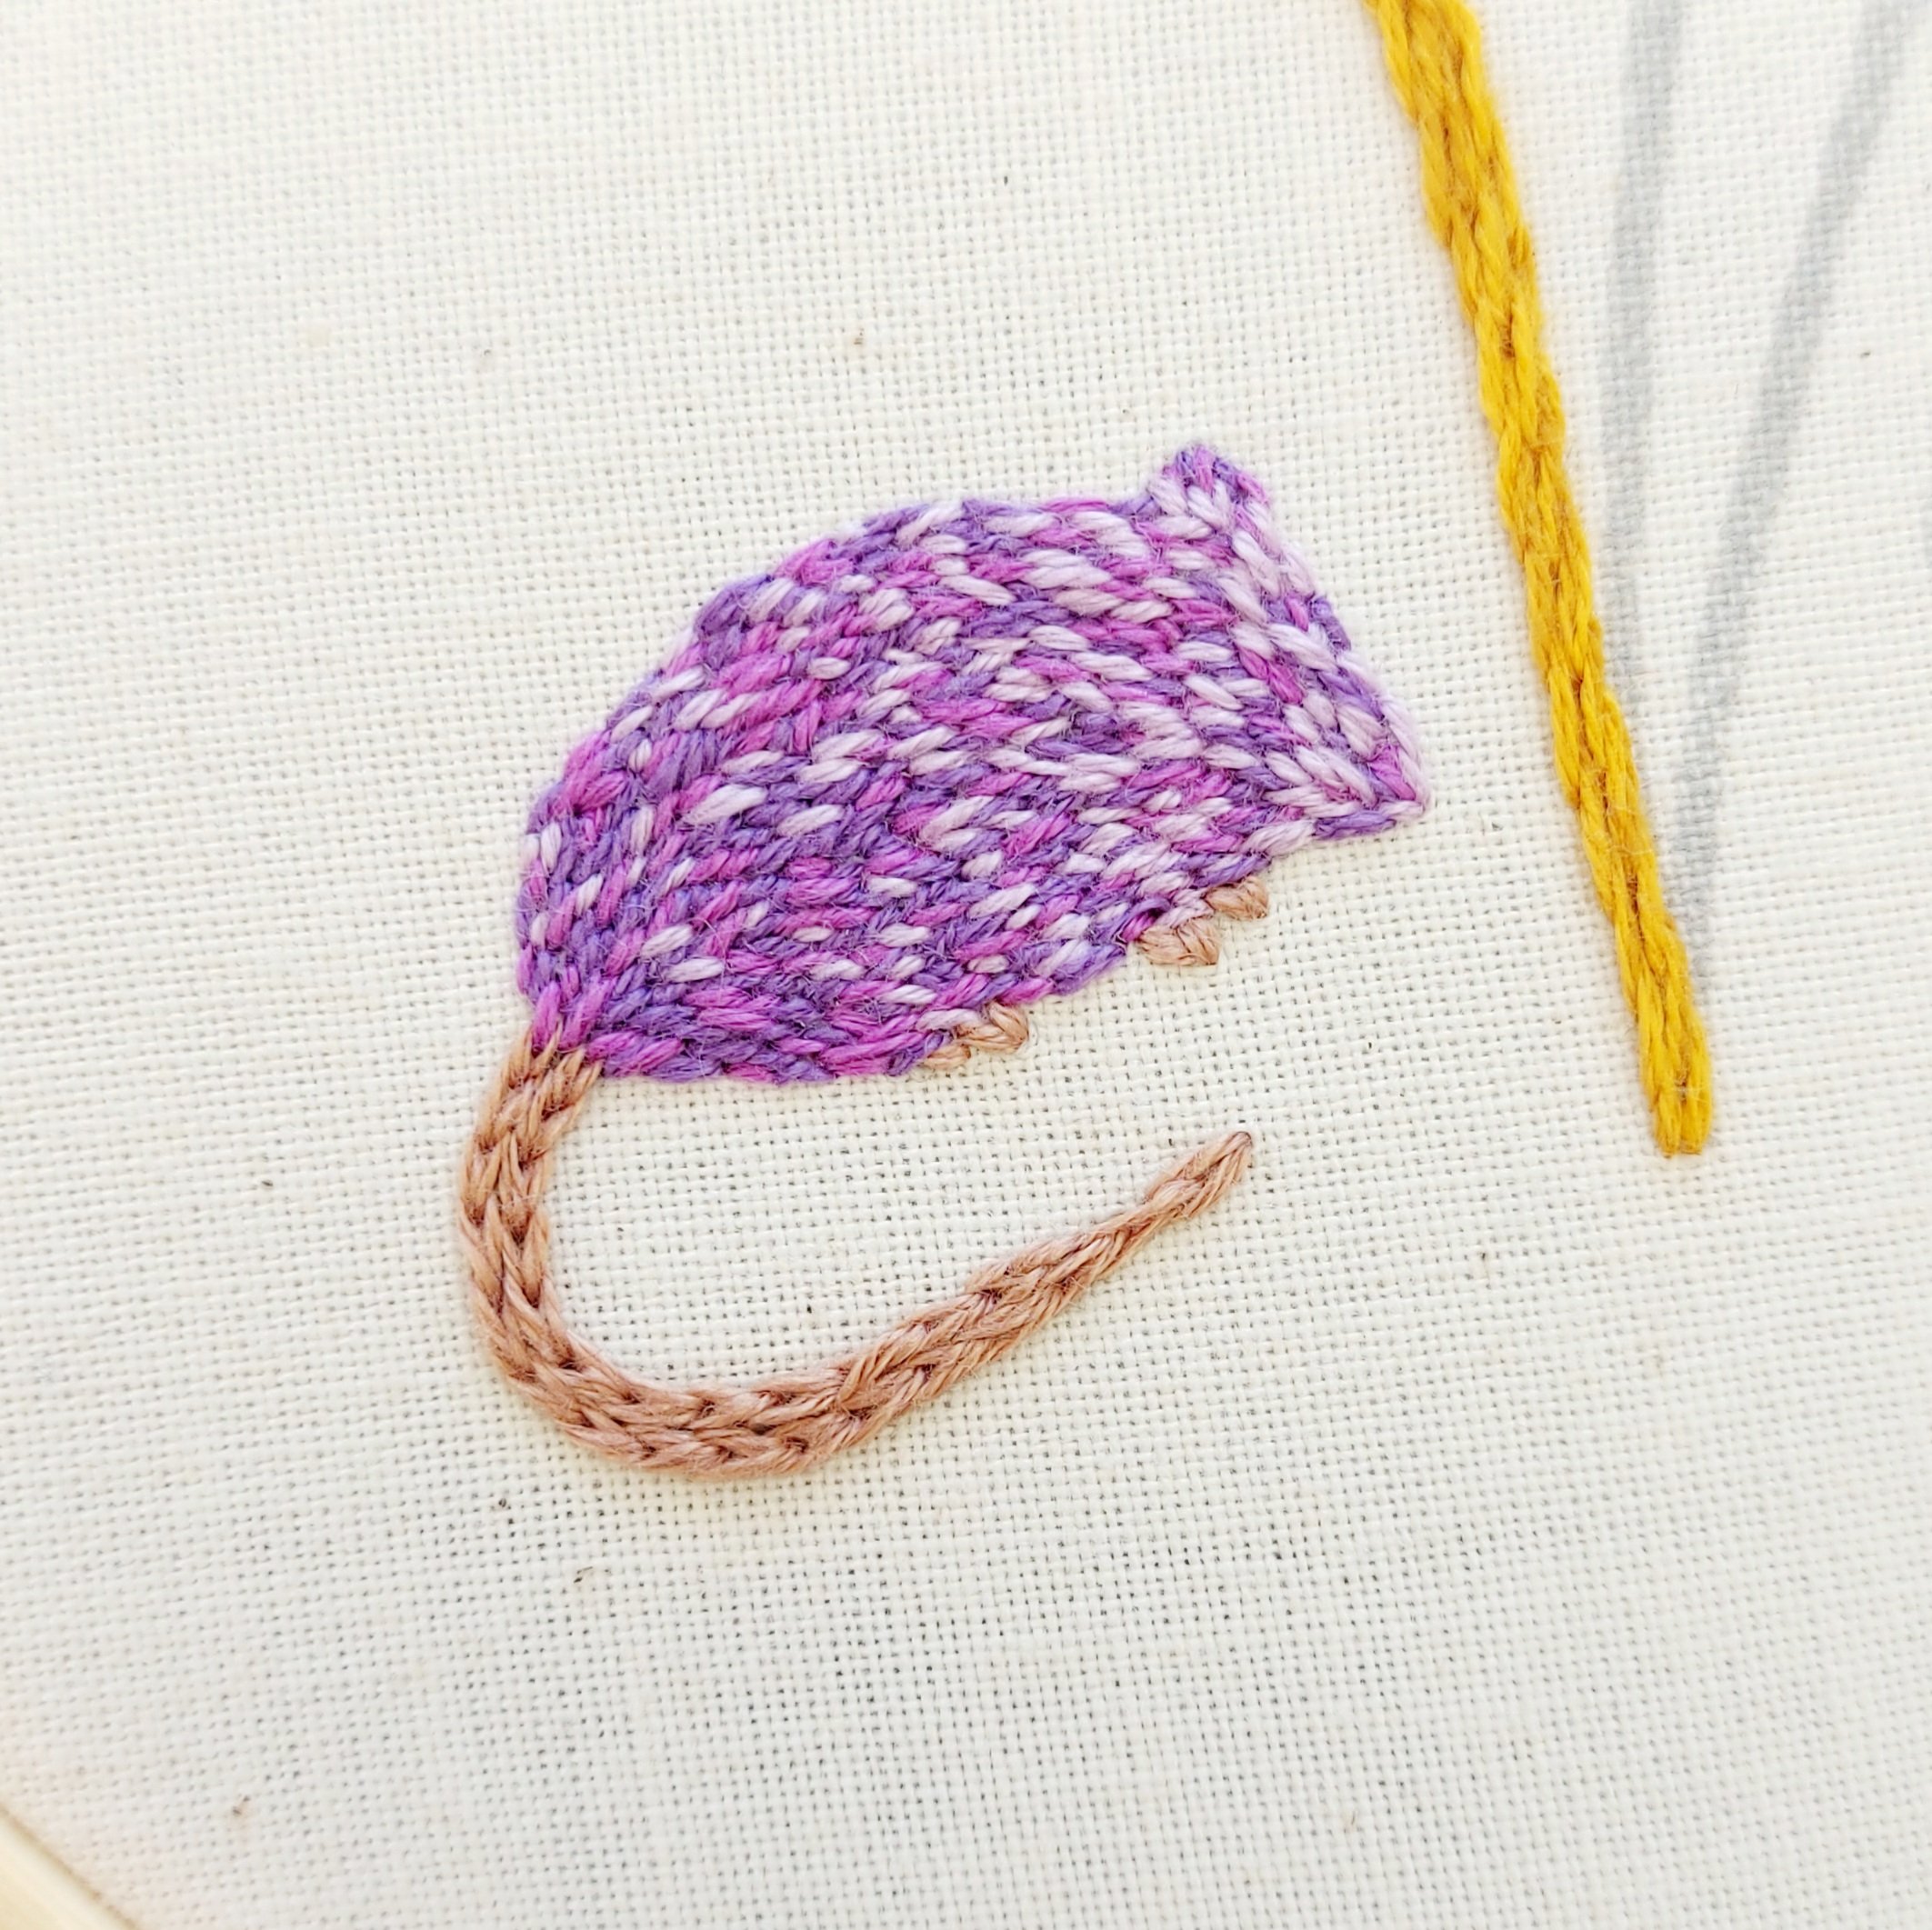
My first layer of stitching with the dark purple.
The Left Mouse
Stitch – Long and Short stitch
Thread colours – Anchor 104, Anchor 107, Anchor 106
Number of strands – 2
Needle size – Small sized needle from my needle pack (my needle packs are available in my shop here).
I used quite small stitches….I’m actually not very good at doing large stitches, I always revert and they end up being small. But for my mice I did intentionally want them small so they would look more fur like.
Tip – Think about your stitch direction. I stitched mine going up his face and then over his back like the fur would in real life.
I started with the darkest purple (Anchor 106) and stitched what is possibly technically a seed stitch over the mouse. I really liked the idea of my mice being lighter at the heads and darker at their bottoms, so I stitched more of the darkest purple at the bottom end and kept the stitching at the head sparser. I varied the length of my stitching and tried to be as random as I could with where I put the stitches.

My second layer of stitching with the mid purple.
I then repeated this with a layer of the mid Purple (Anchor 107). But this time almost filing in the bottom end completely and again leaving the head end sparser.

My third layer of stitching with the light purple.
Finally, I stitched a layer of the lightest purple (Anchor 104) to fill in all the gaps and just added a few in the bottom end to blend down slightly.
You might want to try:
Changing the amount of threads and the length of the stitches would give a very different look. Have a play and see what you like. And of course, you could use more or less colours here. You could do what I’ve done but with just one colour …… your mice will still look cute (after all they do in my original raspberry prints).
You could also try mixing threads and using a split stitch as I have when stitching the wheats…..ooo the possibilities!
I used a split stitch for the tail and a few straight stitches for the feet.
The Left Mouse Tail and Feet
Stitch – Split Stitch and Straight Stitch
Thread colours – Anchor 379
Number of strands – 4
Needle size – Middle Sized
The tail is made up of 2 rows of split stitches. I worked one complete row starting at the tip and worked back to the body. The second row I started a little way up the tail and tucked the first stitch under the first row to blend it in.
Tip – Add a couple of extra fur stitches connecting the tail to the body.
I used a few straight stitches for the feet.

I found it useful to pen on some stitch direction guides.
The right Mouse
Stitch – Long and Short stitch
Thread colours – Anchor 104, Anchor 107, Anchor 106
Number of strands – 2
Needle size – Small sized needle
I stitched this mouse in the same way as the left mouse. I did find it useful to pen on the direction I wanted my stitches for this one as this right mouse is tucked up more than the left one. Also I started with the lightest purple this time, no particular reason, in fact its only on writing this that I’ve realised that’s what I did.

My first layer of stitching with the light purple.

My second layer of stitching with the mid purple.

My third layer of stitching with the dark purple.

I used fewer strands for the right mouse tail and feet.
The Right Mouse Tail and Feet
Stitch – Split Stitch and Satin stitch
Thread colours – Anchor 379
Number of strands – 2
Needle size – Small Sized
With this mouse being smaller and to add some depth, I chose to stitch this tail using less threads.
I stitched the feet with some satin stitches.
So this is where I decided that I really didn’t like how I had originally stitched the wheats…..and it had to go.

I stitched the left wheat first and worked my way from bottom to top.

Mixing thread colours gives a nice affect.
Wheats
Stitch – Split Stitch
Thread colours – Anchor 371 and DMC 783
Number of strands – 2 (one strand from each colour)
Needle size – Small Sized
I really love the effect of mixing thread colours with split stitch. It adds an extra detail but doesn’t give us any extra work!
I started my wheats from the bottom of the stalk and worked my way up each wheat. I started with the one on the left and then blended the stalks of the other wheats into this first stalk.

The print on the embroidery square has been fully coloured in.
So, now that I’ve completely covered my print I could finish my project here! But I do like to add some extras…….I added whiskers and eyes to my mice and some wording around the top.

Adding the faces really gave my mice little characters.
Whiskers
Stitch – Straight Stitch
Thread colours – Anchor 401
Number of strands – 1
Needle size – Small Sized
I stitched 4 whiskers on each side of each face, varying the direction and length each time. I also though about perception here and tucked the whiskers that would be furthest away under the body stitches.
Eyes
Stitch – French Knot with 3 wraps
Thread colours – Anchor 401
Number of strands – 2
Needle size – Small Sized
Where the eyes are placed could give the mice different characters.
If French knots scare you a little bit (I know I used to avoid them) I do have an Instagram video that will help. I used them for my snowman face and show you how to experiment with different numbers of strands and wraps. I’ll pop the link below…..
But you could always use small straight stitches for the eyes if you wanted.
Wording
A lot of people ask me about how I add the wording, so I was very good and took pictures of every step this time. I’ll go through each stage.
Now, depending on how long my wording is (and if I’m having one of my rare days when I like my hand writing) I just write straight onto my embroidery. But, sometimes (mostly) I find it easier to make a template that I can trace onto my hoop.
I start by drawing around my inner hoop.

Next, I roughly hand draw some guidelines of where I would like my wording to go.

You can hand write your wording onto your template if you’d like. But I actually let technology help me out here. I typed my wording onto the computer and found a font that I liked (I used ‘Dreaming Outloud Script Pro). I copy the text and alter the font size a few times so that I’ve got a few options aaand print.

The next bit is a little tricky, and if you’re clever you may know how to make your text curved on the computer and will save yourself this bit. Once I’ve chosen a font size (I went with 48) I trace my printed text onto my template. I trace one letter at a time and turn the printed font around a bit before tracing the next letter following my guidelines as I go. I find it easiest to trace against a window so I can see what I’m doing. Then I have my finished template.


I cut out my circle template and hold it to the inside of my hoop. By holding the hoop up to the light you can play around with the positioning. Once happy, tape your template onto the back of your hoop.


Then you can trace your template onto your embroidery. Again, I find holding my hoop up to a window helps me out here.
Now, there are many types of fabric pen you could use for this. I like to use the Pilot Frixion 0.7 black pens (they can be removed with a blast from the hair dryer…..so cool!). I have used air erasable pens in the past, but I find that they can disappear before I finish stitching and I end up having to re trace a few times. You could also use an ordinary pencil, but just bear in mind that any pencil lines that you don’t cover with thread will be seen so make them thin and light.

This is the Pilot Frixion pen that I like to use.


And there you go, you’re ready to stitch your wording.

Smaller stitches will make your curves smoother.
Stitch – Backstitch (French knot to dot my i with 1 wrap)
Thread colours – Anchor 401
Number of strands – 3
Needle size – Middle Sized
Backstitch is my ‘go to’ stitch for wording but split stitch and chain stitch are other common stitches used for wording.
Tips – make your stitches small to help the curves you might have in your font. I stop and start each individual word to avoid any thread shadows showing through (as I’ve used a dark thread and the fabric is light).
Hair dry off any pen that is showing….Magic!

Pen marks that are left showing can be hair dryed off!

Magic disappearing pen marks!
Finishing
I personally, love to display my embroidery projects in their hoops. You can watch this Instagram video on how I finish off the backs……….
I like to finish mine this way so that it can be easily undone in the future if I decide to display my embroidery in another way.

1) Cut about 1” around the edge of your hoop

2) Use six strands of thread (I use a light coloured thread to make sure it wont show through the front) and stitch a running stitch all around the outside. Don’t knot the end of this thread and leave a tail where you start.

3) Pull on the tail threads to gather in the fabric around the hoop. Pull tight but be careful not to snap your thread……it is cotton after all.
4) Tie a knot to secure. I like to tie a little bow too, just so I can find the knot easily at a later date if I need to.
And that’s it! One finished mouse embroidery ready for hanging on a wall or displaying on a dresser.

My finished mouse embroidery project.
If you enjoyed this one, check out my other embroidery blog posts. Some of them have links to live stitching videos that you can stitch along with.
Enjoy your stitching!
Until next time,
Liz x