Duck Embroidery- Rainy Days
Well, it just had to be my duck design for April stitch along…….although so far we’ve been very lucky with the sunshine and had very few showers.
So, here’s my recap of my stitching. I’ve noted which stitches I used, the thread colour, number of strands and which needle I used. But don’t forget the beauty of my embroidery squares is that you can colour them in using which ever stitches and threads you like! I’ve also added the links to my Instagram live videos, so you can give them a watch if you need to, even if you don’t have an Instagram account.
Just a quick note: Since stitching this duck, I’ve updated my embroidery panels. While the new panels are no longer hand-printed, the duck design remains similar (just the outline). You can still use this blog as a guide for stitching it, and the links now direct to the updated version of the design.
If you fancy giving this one a go, you can buy your Rainy Days embroidery square here.

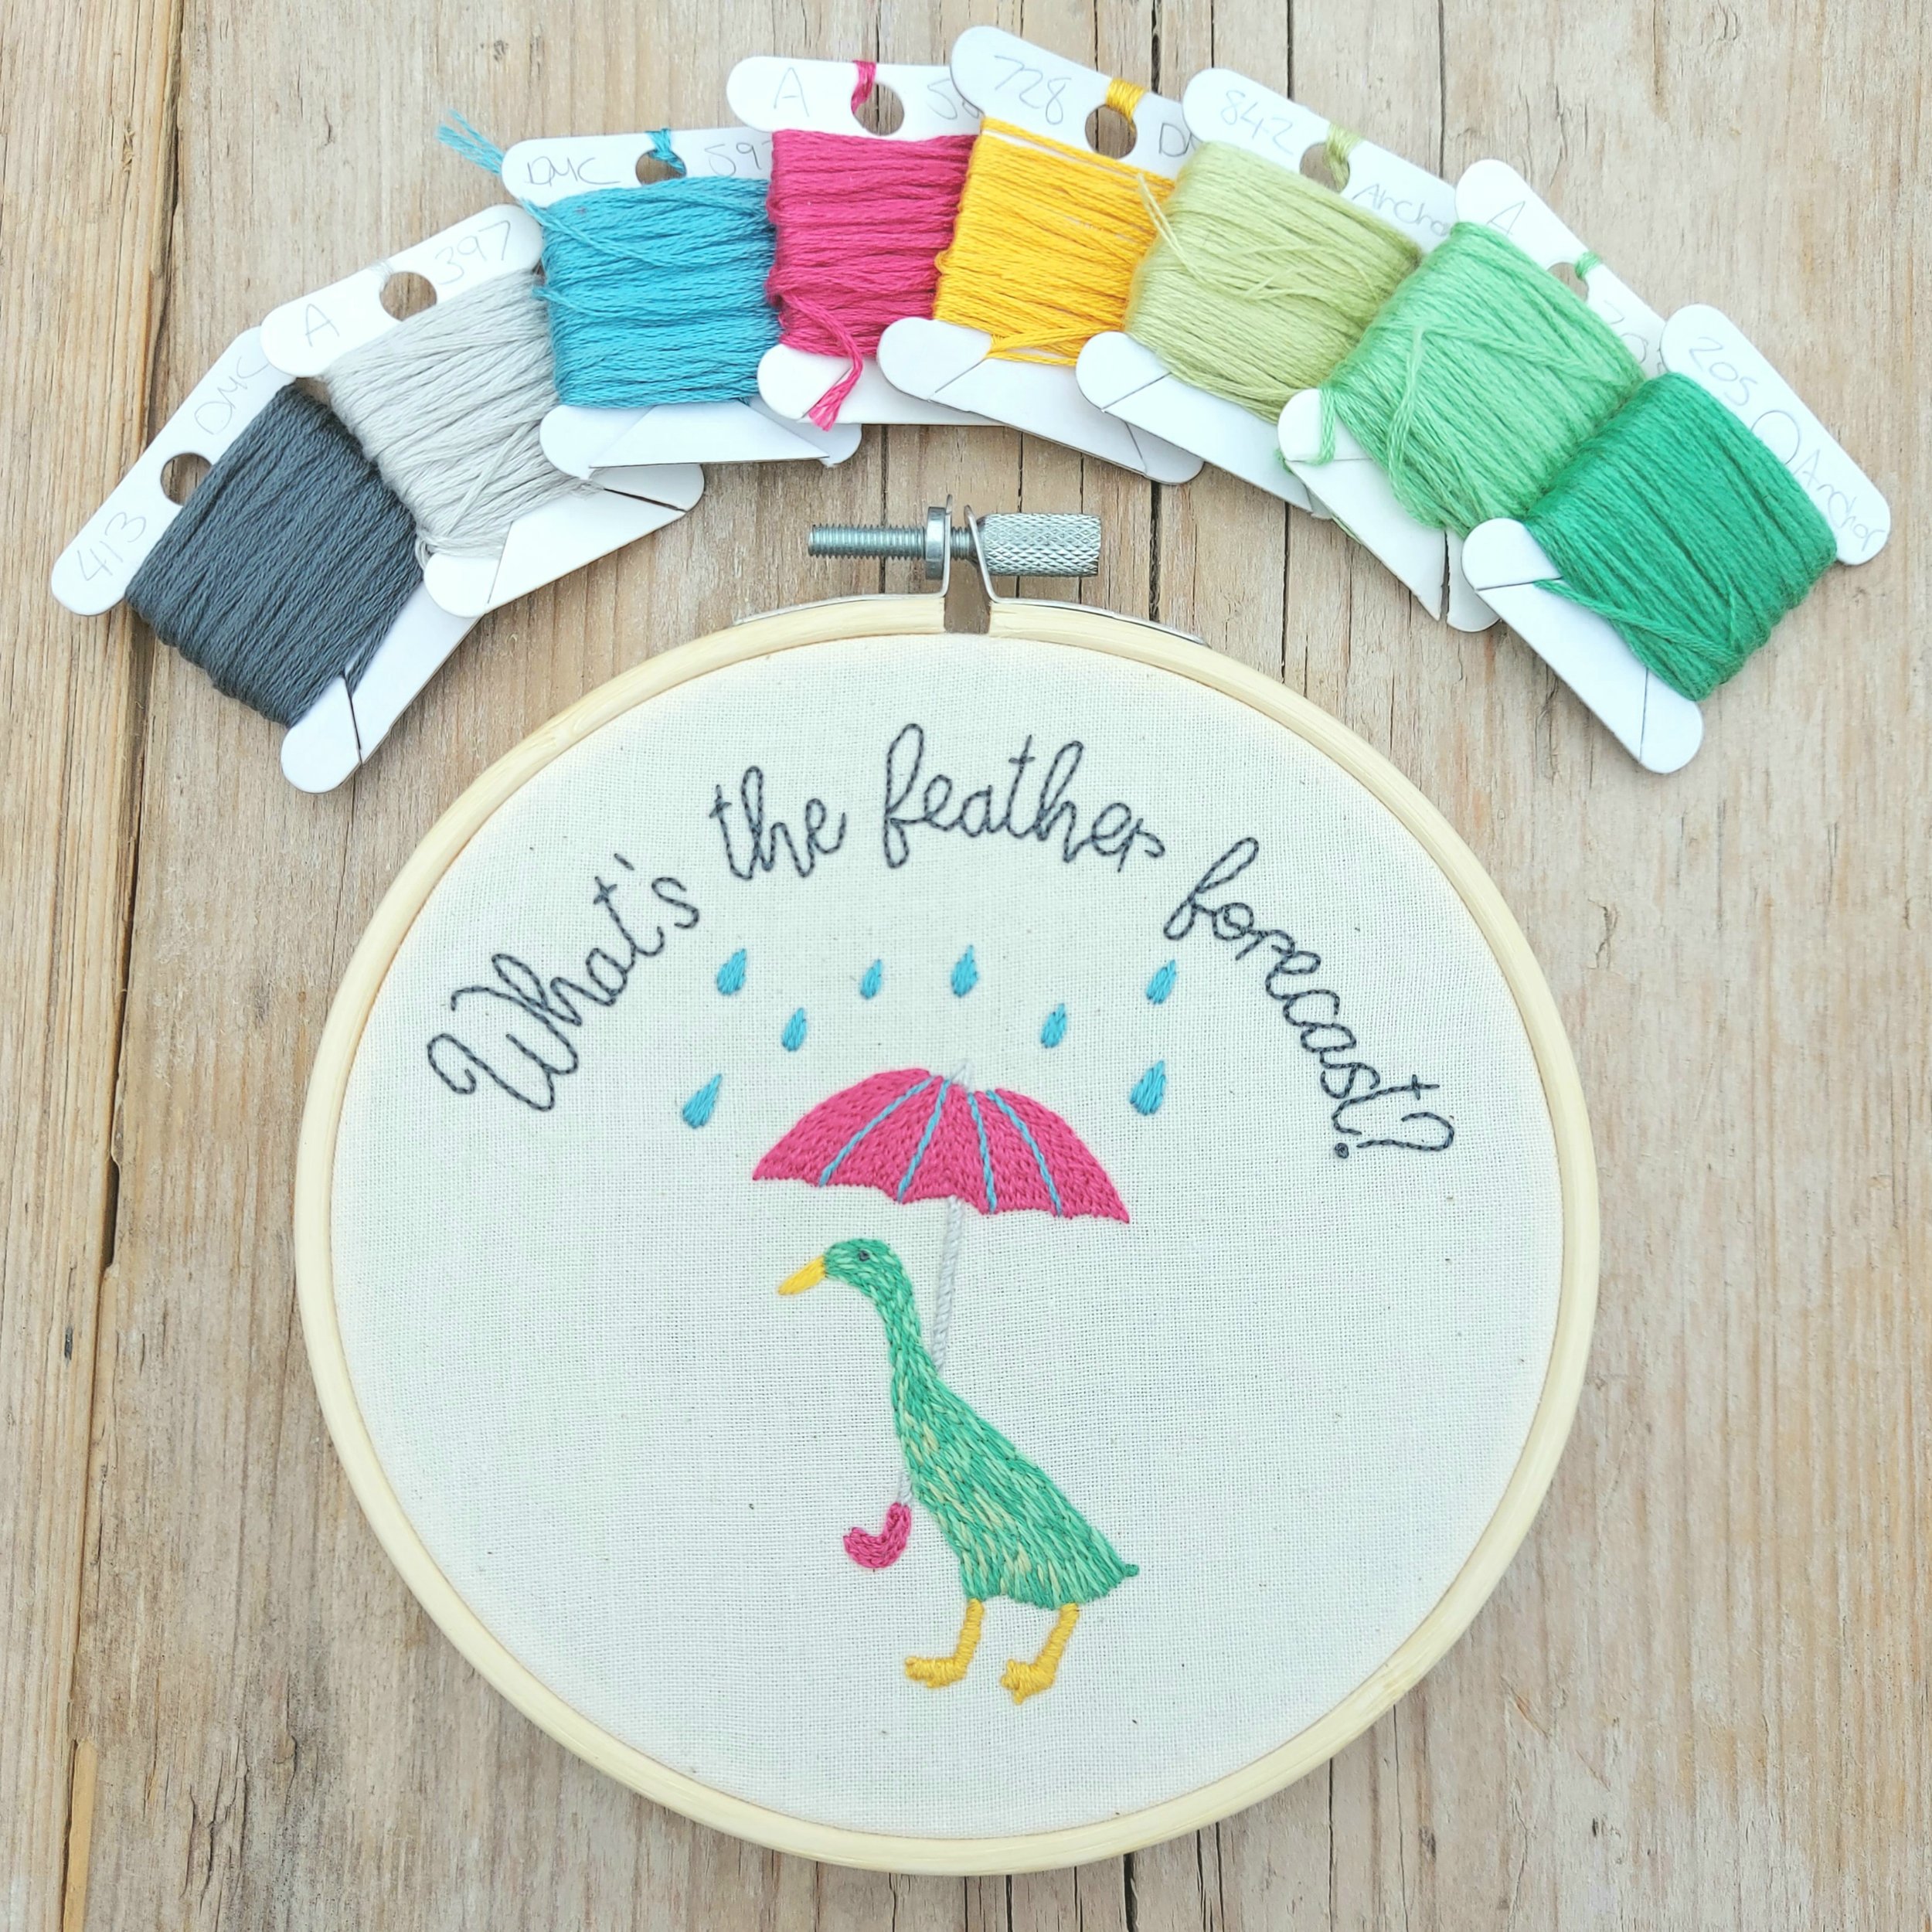
I print my designs onto calico squares in grey so that you can colour them in with thread!
I used 8 different thread colours for this embroidery project: Anchor 205 (green), Anchor 703 (mid green), Anchor 842 (light green), Anchor 58 (pink), DMC 597 (blue), Anchor 397 (light grey), DMC 728 (yellow) and DMC 926 (grey). Although it turned out that DMC 926 wasn’t quite dark enough so I switched it out for DMC 413 (dark grey) after I recorded the Instagram live video.
But please do have fun using as many or few colours as you like!

I used 3 different greens for my ducks body.
Part 1 – video link
I started with the duck’s body….I just thought this was the most exciting part!
Stitch – Long and Short stitch
Thread colours – Anchor 205 (green), Anchor 703 (mid green), Anchor 842 (light green)
Number of strands – 2
Needle size – Small sized needle from my needle pack (my needle packs are available in my shop here).
I started with the darkest green, this is the green that I wanted to be most dominant, so I did more stitches in this colour than the other 2 greens. I then added a layer of the mid green and just a small amount of the light green on the duck’s chest. I really like how using the 3 different greens in this way has added texture to my duck.
It could also be fun to take a strand from different colours and put them together to stitch with all at once!

It was so difficult to choose which colour to stitch my umbrella in……it could of been so many colours!
Part 2 – video link
Next, I stitched the main umbrella using a filling stitch for the main sections and then divided them with a line stitch.
Main umbrella:
Stitch – Split stitch
Thread colours – Anchor 58 (pink)
Number of strands – 3
Needle size – Middle
Umbrella divides:
Stitch – Stem stitch
Thread colours –DMC 597 (blue)
Number of strands – 3
Needle size – Middle

I love the twisted look that a whipped stitch makes.
Part 3 – video link
In this video I stitched the umbrella handle as well as the raindrops. The umbrella handle is made up of 3 different sections:
‘Metal’ part of the handle:
Stitch – Double whipped back stitch
Thread colours – Anchor 397 (light grey)
Number of strands – 3
Needle size – Middle

I just did a few stitches for the spike at the top.
Umbrella spike:
Stitch – Straight stitch
Thread colours – Anchor 397 (light grey)
Number of strands – 3
Needle size – Middle
I stitched the outline of the spike first, and then filled in with a couple of shorter straight stitches.

I matched my handle to my main umbrella.
Umbrella handle:
Stitch – Split stitch
Thread colours – Anchor 58 (pink)
Number of strands – 3
Needle size – Middle
I adjusted my stitch length to make sure that I kept a nice curve to my handle; the smaller the stitches the less angular those curves are going to be.

Every raindrop is different…..as I think they should be!
Raindrops:
Stitch – Satin stitch
Thread colours – DMC 597 (blue)
Number of strands – 3
Needle size – Middle
I found that it was easier to make the first stitch straight down the middle of the drop, then to stitch the shorter stitches either side. This not only helped to keep the stitches straight but also helped to shape the drops with that nice round bottom and pointed top.

Not gonna lie…..I found his feet really fiddly.
Part 4 – video link
In this video I stitched the ducks feet, beak, eye and I added some wording to my hoop (which of course is completely optional as with every aspect of my embroidery squares).
Duck feet:
Stitch – Satin stitch
Thread colours – DMC 728 (yellow)
Number of strands – 3
Needle size – Middle
I found that the ducks feet was the most fiddly part in this project! Definitely a part to take your time with and keep looking at your work from a distance. I added some extra stitches to mine using just 1 strand to fill in some bits that I wasn’t happy with without making the feet too bulky.

The placement of the eye could give your duck a completely different character!
Duck beak:
Stitch – Satin stitch
Thread colours – DMC 728 (yellow)
Number of strands – 3
Needle size – Middle
I actually unpicked my beak after this video and restitched using just 2 strands; the beak was just a bit bulky next to the body for me – I was much happier with the 2 strands.
Duck eye:
Stitch – French knot with 1 wrap
Thread colours – DMC 413 (grey)
Number of strands – 2
Needle size – Small
I used DMC 926 in the video but his eye didn’t really show up on his body very well. So I changed this grey for a slightly darker one, DMC 413.

This is such a great way to personalise your hoop.
This is such a fun way to really personalise your hoop. I readjusted my square in the hoop to move my duck down slightly and give me a bit more room above for my wording. I decided to go for ‘What’s the feather forecast?’ – I just love a pun!

I like to use Pilot Frixion pens to add wording to my hoops.
I like to use Pilot Frixion pens. Although not technically a fabric pen, these pens disappear with heat. So, a quick blast with the hair dryer after I’ve finished stitching and any pen marks vanish! Its total magic.
A few little words of warning though. This pen works fantastically on my embroidery squares but if you’re going to use one on a different material, test it in a corner first…..just in case. Also, I only use the black ones. These pens come in a rainbow of colours and I have heard that some of them aren’t as easy to remove.
There are lots of fabric pens out there to choose from though, so use what you have. And if you don’t have one, use a pencil. Just make sure to make really really light pencil marks though and cover them with your stitching as you wont be able to rub these out at the end.
How I add the wording:
I like to freehand write my wording on. However, as I chose quite a long sentence I was finding it hard to get my wording central…….which was super annoying for me. So for this one, I wrote onto paper first. Then I cut it down and taped it to the back of my hoop and traced it by holding my hoop up to a light. This way I was able to readjust my wording and get it exactly where I wanted it.
Then just stitch over the pen.
Stitch – Back stitch
Thread colours – DMC 413 (grey)
Number of strands – 2
Needle size – Small
I used quite a curvy font, so I kept my stitch length pretty small so I could keep it nice and smooth.
I love this colour palette!
And here he is!
If you fancy giving it a go, you can get your Rainy Days embroidery square HERE.
You can buy the squares individually if you already have a stitching stash to use, but I also stock threads, needles and hoops if you need them. And don’t forget the duck stitching video series is available on my Instagram and use #bluebellloveembroidery to show off your beautiful work – I really love to see it!
And most importantly, enjoy!
Until next time,
Liz x