How I Stitched the Rabbit Panel: A Step-by-Step Guide
The first of my new embroidery panel designs! You may have noticed I’ve made some improvements and changes to my panels. My original ones were hand-printed (by me! 😊), just like my lavender bags but in grey, so I wouldn’t influence your thread choices 😊
But… as much as I loved printing them, it limited the stitches we could use. Outline stitches or gappy stitches weren't ideal because no one wants grey showing through, do they? 🥴
So... I've now drawn all my panel designs digitally! 🎉 These new panels are still based on my original designs, but now that I don’t have to make new screens for hand-printing, I’ve been able to add extra details and cute background scenes. Plus, drawing them as just outlines means way more stitches that we can play with. Hurrah!
It's been bittersweet. 🥲 I've been a little sad to say goodbye to my hand-printed panels - I never would've thought that an urge to stitch one of my prints one day would turn into this! 😄🪡 But these new panels! 😍 They're still fun little projects - perfect for using up some of your thread stash 🪡 and now you’re able to play with even more stitches 🎉
The same rule applies as before… there are no rules! 😄 Use any colours, threads and stitches you like. Stitch as much or as little of the design as you fancy – just the outlines, colour in some sections or cover every inch.
Now that I’ve stitched the rabbit and dandelion panel, I’ll walk you through how I stitched it in this step-by-step guide. I’ll cover everything from the threads and stitches needle sizes, techniques, and handy tips to make the process easier. I hope this guide helps you create something you love.
Let’s get stitching!

What You’ll Need
Gather your supplies! Here’s everything you’ll need to get started:
A rabbit embroidery panel
A 5” embroidery hoop
Extra white fabric to double up in your hoop
Embroidery needles (I’ll explain sizes below)
Embroidery threads
Scissors
A nice hot cuppa... or two! 🤭
Don’t worry, I’ll break down each of these in more detail below so you’ll know exactly what to use and why.
A Rabbit Embroidery Panel
First up, you’ll need one of my rabbit embroidery panels. These are digitally printed onto 100% cotton using eco-friendly, water-based pigment inks right here in the UK.
You can grab your panel from my shop here………
I also offer these panels and part of a Panel Pack, which includes the 5” hoop and extra fabric 😊

A 5” Embroidery Hoop
This design fits in a 5” hoop. I always prefer using a hardwood hoop - I find that they’re more durable and keep a nice even tension. Being a natural material, wooden hoops do sometimes have small imperfections, but I do find hardwood ones tend to have fewer gaps and hold the fabric more securely.
Extra White Fabric
I highly recommend doubling up the fabric for these panels! Now, I don’t usually do this – but I really wish I had for my rabbit. 😬
You’ll see in the step-by-step guide that I only used one layer, and I nearly started over! 🙈 I stuck with it in the end (because it was looking too cute to unpick!), but when I started my wildflower design, I doubled up the fabric, and it made such a difference. The white cotton stayed crisp, and it really helped prevent thread trails from showing through to the front.
So, learn from my mistake - use two layers of fabric if you can!
Embroidery Needles
Using the right needle makes a big difference in how neat and precise your stitches turn out. Embroidery needles come in different sizes, and here’s what to keep in mind:
Larger needles: Best for stitching with all 6 strands of embroidery thread. They create bigger holes in the fabric, so if you’re using fewer strands, your stitches might shift of leave gaps.
Smaller needles: Great for finer stitching with 1-2 strands. If used with too many strands, though, pulling the thread through smoothly can get tricky.
To keep things simple, I offer needle packs in my shop with six needles in three sizes:
Large needles: For stitching with 6 strands.
Medium needles: For stitching with 3–4 strands.
Small needles: For stitching with 1–2 strands.
I’ll refer to these sizes throughout the guide so you can follow along easily. You can grab a needle pack from my shop here:

Embroidery Threads
For this project, I used Anchor 6-stranded cotton threads – my favourite! They have such vibrant colours and hold up beautifully over time.
I picked these shades from my (overflowing) thread stash, but feel free to choose colours that match your vision for your adorable bunny!
A rough colour plan before you start can be helpful, but don’t be afraid to adjust as you go.
Here’s the full list of 10 colours I used:

Anchor 297 – Dandelion Yellow
Anchor 244 – Darker Green
Anchor 242 – Lighter Green
Anchor 848 – Light Grey
Anchor 355 – Golden Brown
Anchor 358 – Mid Brown
Anchor 360 – Dark Brown (just a tiny bit for the rabbits eye)
Anchor 100 – Dark Purple
Anchor 97 – Mid Purple
Anchor 95 – Light Purple
Anchor threads are numbered for easy reference, so if you’d like to match my colours exactly, look for these numbers. And remember, this is your project! Have fun experimenting with colours that inspire you.
Scissors
Any sharp scissors will do the job, but embroidery scissors are ideal. Their small, pointed blades help you trim threads cleanly and reach tight spaces without fraying the ends. If you don’t have embroidery scissors, any small, sharp scissors from your sewing kit will work just fine.
A Nice Hot Cuppa
I’m a tea girl… but you do you! 😊☕
2. The Stitches
Here are the stitches I used for this one:
Satin Stitch
Seed Stitch
Straight Stitch
Whipped Backstitch
Leaf Stitch
French Knots
Granito Stitch
Stem Stitch
Split Stitch
Long and Short Stitch
Oh! I didn’t actually realise how many stitches I’d used until I wrote this up! 😆 Just remember - you can pick stitches that you love. You could absolutely stitch this using fewer stitch types… but you could also add in even more! Have fun with it. 😊
For extra guidance on stitches, be sure to check out my ‘Stitch of the Week’ page, where you’ll find a growing library of stitch tutorial videos. While not all stitches might be up just yet, the collection is expanding regularly!
3. Let’s Start Stitching
First, pop your embroidery panel and extra fabric into the hoop, making sure the fabric is nice and taut. I always aim for a drum-like tension - it helps keep stitches neat and prevents wrinkles in the fabric.
Here’s how to get that nice drum tension:
Place the fabric over the inner hoop and press the outer hoop on top.
Gently pull the edges of the fabric outside the hoop to smooth out any bumps or wrinkles.
Tighten the screw mechanism until the hoop feels secure.
Give the fabric around the edges one final pull to tighten it further.
Your fabric should now feel tight like a drum and be ready for stitching!
💡 Tip: Keep an eye on the tension as you stitch – it can loosen with stitching. If that happens, simply tighten it back up as needed.
4. Step-by-Step Stitching Guide
Now, you might notice that my panel looks a little different from yours—the lines are darker and a bit wibbly 🙈. That’s because I just couldn’t wait for the actual panels to arrive before I started stitching! (I also wanted to test a few areas, which I’ve now tweaked.) So, I traced the design by hand—but don’t worry, your panel is pre-printed and ready to go! 🥳
Okay, onto the stitching!
The Dandelion Petals
I started with the dandelion flowers because I just wanted to get that sunny bright yellow straight in there! I began with the petals in the centre of the flower and then worked my way outwards.
Stitch – Satin Stitch
Thread colour – Anchor 297 (Dandelion Yellow)
Number of strands – 6
Needle size – Large
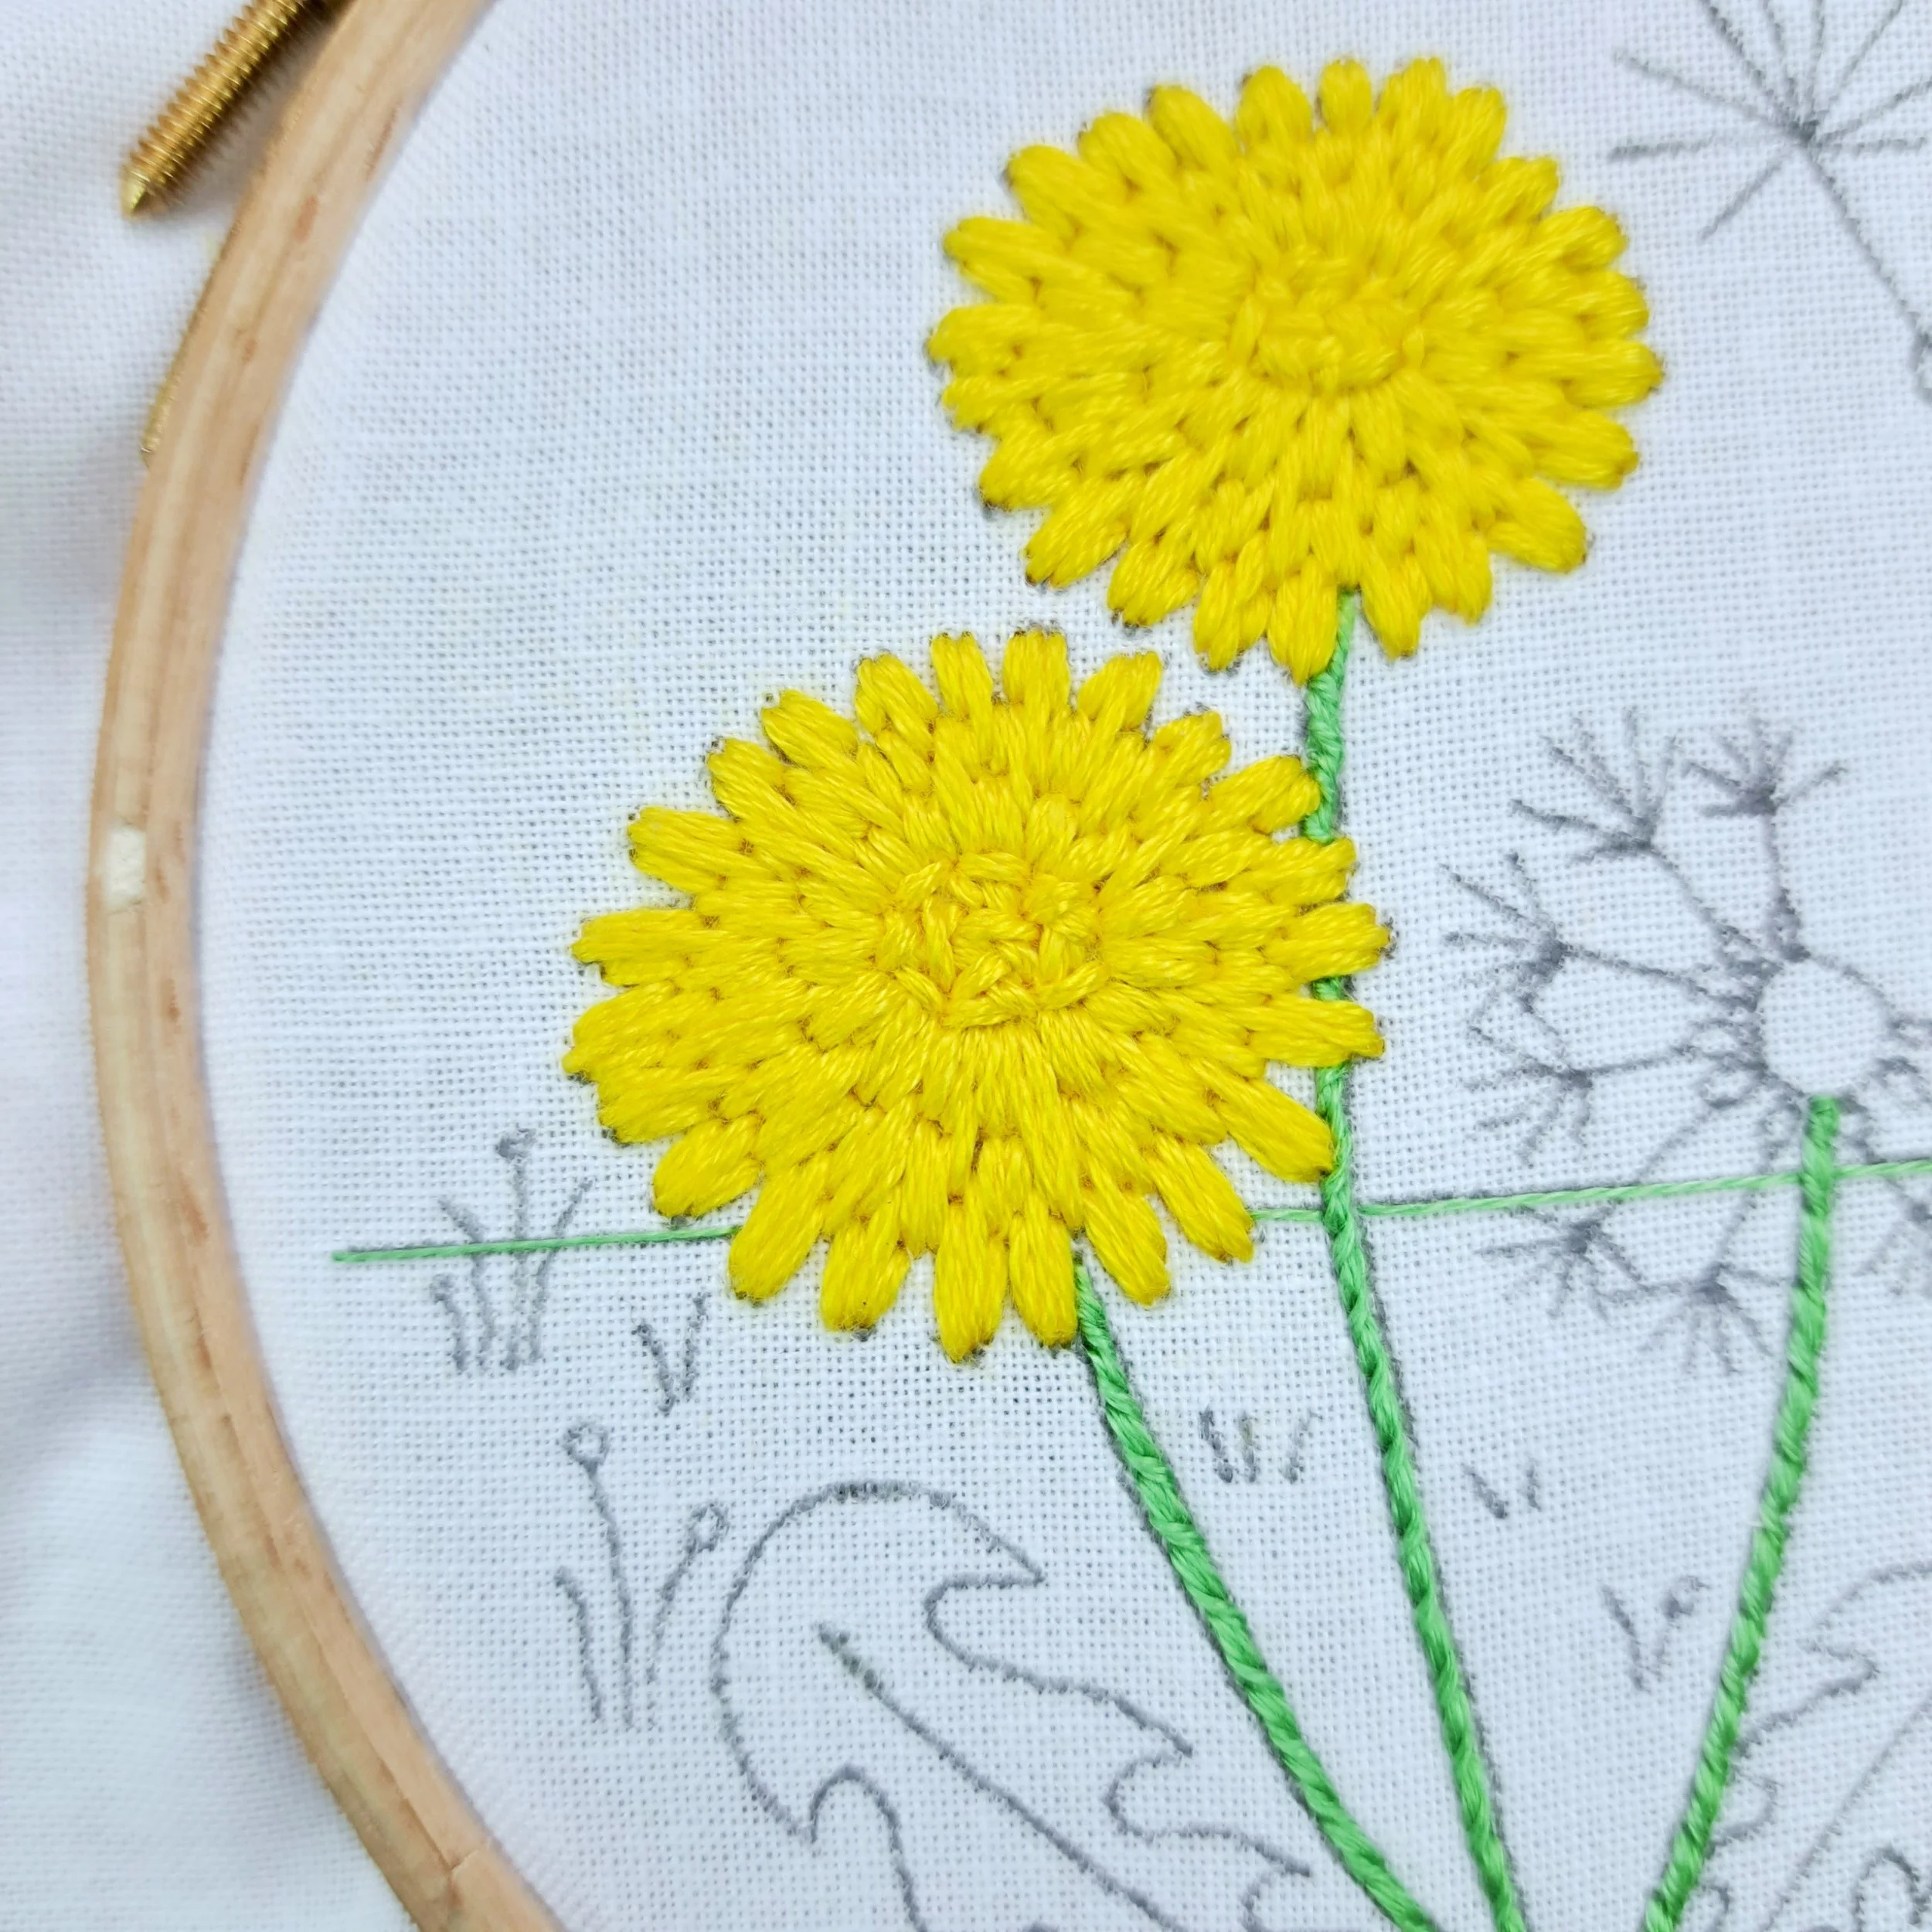
Dandelion Centres
I actually started these with Turkey Stitch at first—it looked nice, but not quite how I wanted. So instead, I went for a nice, thick, dense Seed Stitch, which gave the perfect texture!
Stitch – Seed Stitch
Thread colour – Anchor 297 (Dandelion Yellow)
Number of strands – 6
Needle size – Large
The Horizon
Next, I stitched the horizon so I could layer the other elements over the top later on. I stopped and started around the stems and rabbit, but stitched straight over those little grasses.
Stitch – Straight Stitch
Thread colour – Anchor 242 Lighter Green
Number of strands – 1
Needle size – Small

Dandelion Stems
For each stem, I stitched a double row of backstitch and then whipped them together.
I started with the stem on the right - since I’m right-handed, I find it easier to whip my stitches from right to left. This way, I didn’t have to worry about accidentally catching any stitches I’d already done. If you’re left-handed, you might find the opposite direction easier.
✨ A little tip:
I like to press a finger underneath the hoop, right under the area I’m whipping. This raises the fabric slightly and helps avoid catching the needle on any stitches.
Stitch – Whipped Backstitch
Thread colour – Anchor 242 (Lighter Green)
Number of strands – 2
Needle size – Small

Dandelion Leaves
Technically, you could say I used a mix of Leaf Stitch and Satin Stitch here (but hopefully the stitch police aren’t around 😏).
I started stitching at the top, rounded part of the leaf and worked my way down. At the top, I added a few ¾-length stitches here and there to keep it from becoming too raised compared to the rest of the leaf. For the thinner sections, I switched to Satin Stitch, making sure the stitch direction still followed the Leaf Stitch.
Stitch – Leaf Stitch (mostly, with a bit of Satin Stitch)
Thread colour – Anchor 244 (Darker Green)
Number of strands – 3
Needle size – Middle

The Fairies (the flying ones and the ones on the seed ball)
I love these fairies! I kept them light and delicate by using simple Straight Stitches. Each set of stitches goes into the same hole.
Stitch – Straight Stitch
Thread colour – Anchor 848 (Light Grey)
Number of strands – 2
Needle size – Small

The Seeds (the flying ones and the ones on the seed ball)
For the seeds, I used Granito Stitch, which gives them a lovely, textured look. The larger seeds have a few more stitches than the smaller ones, creating some nice variation.
Stitch – Granito Stitch
Thread colour – Anchor 355 (Golden Brown)
Number of strands – 3
Needle size – Middle
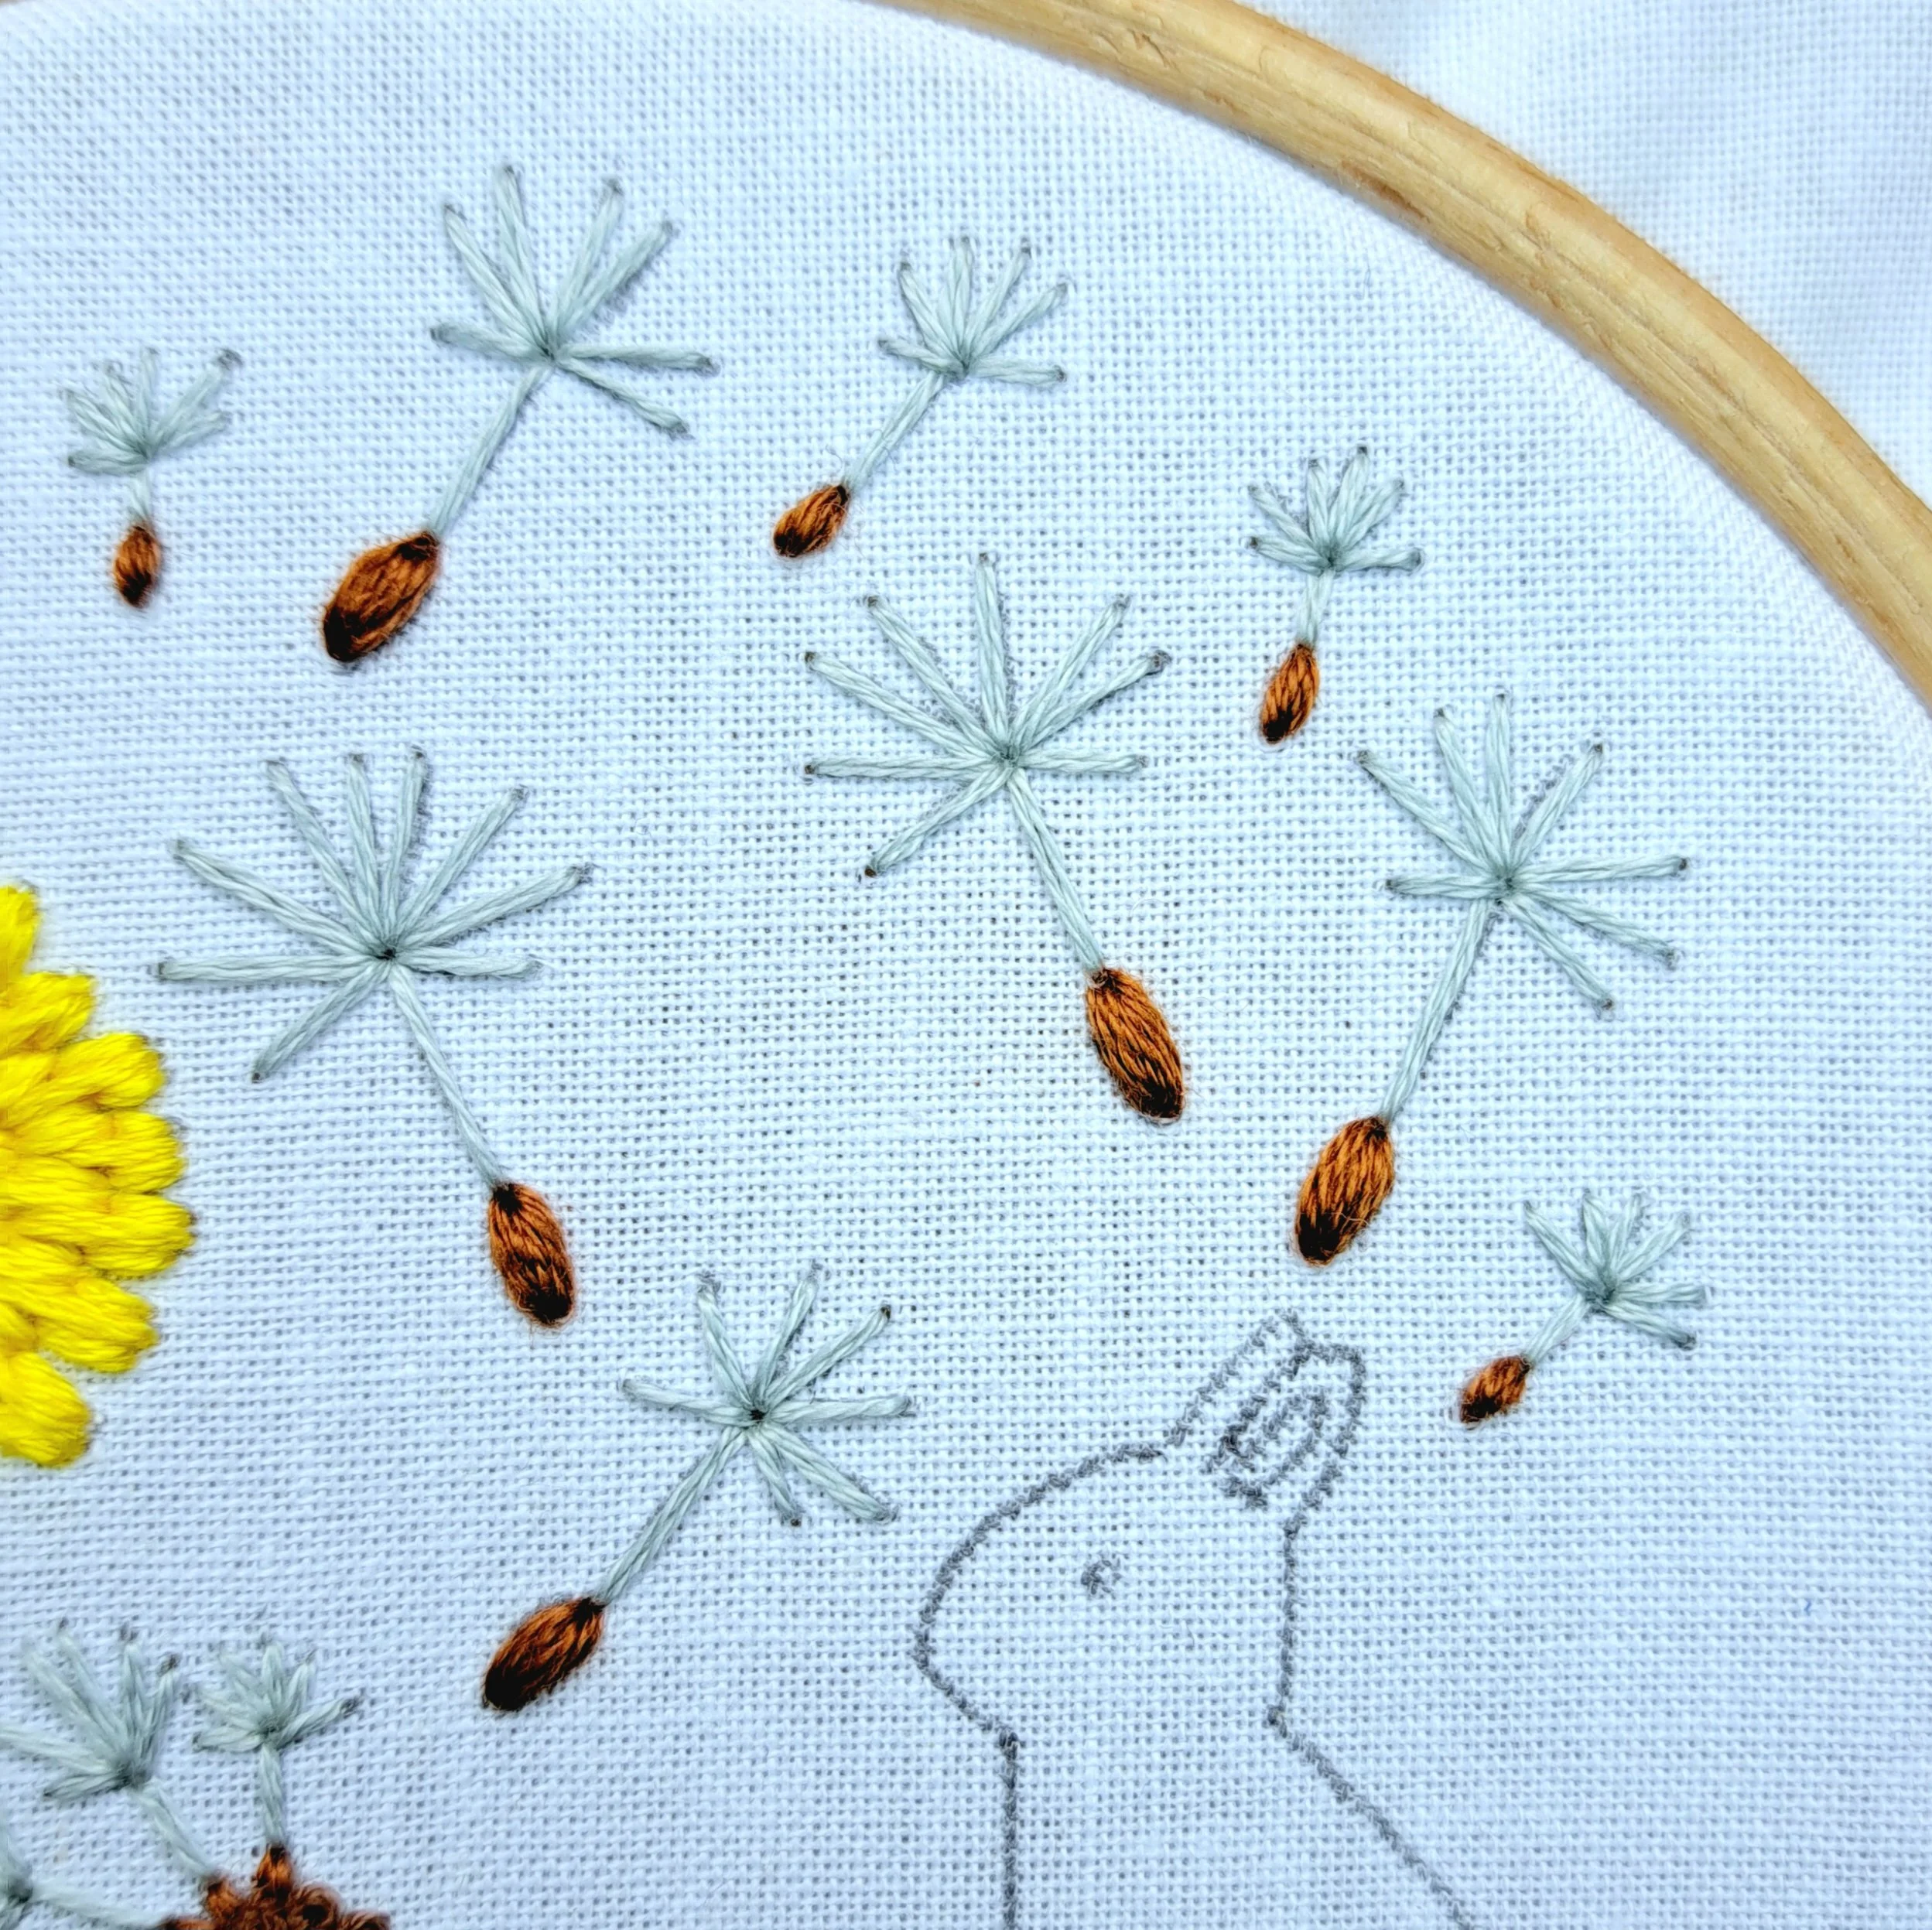
Seed Ball Centre
To finish off the dandelions and seeds, I stitched the seed ball centre. I find that stitching a neat circle of French Knots is easiest when I start with a round of knots on the outside and then work my way inward to the centre.
Stitch – French Knots (with 2 wraps)
Thread colour – Anchor 358 (Mid Brown)
Number of strands – 3
Needle size – Middle


This is how we’re looking so far 🪡
Grass and Small Stems
I stitched all the grass and small stems in the same way but used two different greens. I alternated between the two greens randomly, trying my very hardest not to make any patterns. For this bit, I used the same number of strands, but you might want to try using more strands for the grass blades and stems at the front of the design to add some extra depth and dimension.
Stitch – Stem Stitch
Thread colour – Anchor 242 (Lighter Green) and 244 (Darker Green)
Number of strands – 2
Needle size – Small

If you look closely here, you can see the my thread trails traveling between the flowers - that’s why you should use two layers with these panels 🙈
Small Flowers
I stitched these cute little flowers in two different sizes, by decreasing the number of wraps for the flowers in the distance.
Stitch – French Knots (with 2 wraps for the closer ones, and 1 wrap for the ones in the distance)
Thread colour – Anchor 297 (Dandelion Yellow)
Number of strands – 3
Needle size – Middle
Rabbit Detail Lines
Now all that’s left is that adorable bunny! 🐰 In truth, I left the rabbit until last because I just couldn’t settle on what thread colours to use 🙈 There were so many options I loved, and this could’ve looked completely different! In the end, I went with purples, but pinks would’ve looked beautiful with that yellow and green combo, and more natural rabbit colours would’ve worked nicely too!
I started by stitching a single row of Split Stitches along the foot, leg, arm, and ear lines. I figured this would be easier to stitch when I could see the lines clearly.
Stitch – Split Stitch
Thread colour – Anchor 100 (Dark Purple)
Number of strands – 2
Needle size – Small

Rabbit Fur
Of course, you could stick with just one thread colour here, but I love the effect of layering a few different shades!
I started by covering most of the rabbit with Long and Short Stitches using the dark purple. I stitched over the top of the eye but stitched around the ear.
Next, I filled in most of the gaps with the mid purple, and finally, I added stitches with the lightest purple for some highlights.
✨ A little Tip:
Angle your stitches to follow the curves of the rabbit’s body.
Stitch – Long and Short Stitch
Thread colour – Anchor 100 (Dark Purple), 97 (Mid Purple) and 95 (Light Purple)
Number of strands – 2
Needle size – Small


This is how my rabbit looked after stitching all 0f the long and short stitches in dark purple. I know - it looks a little crazy right now, but trust the process!

This is the stage where half of the mid-purple long and short stitches have been added. I’ll straighten up the bottom too - somehow I’ve gone a bit skew-whiff (that’s what happens when you stitch late at night! 🙈). That’s the great thing about long and short stitch - you can just add more stitches in wherever you need or want them!🪡😊

And here’s the completed long and short stitching with the light purple added in. I added some extra stitches in the lighter shades near the detail lines to help them stand out a bit more.
Rabbit Ear
This little ear only takes a few stitches! 😊
Stitch – Satin Stitch
Thread colour – Anchor 848 (Light Grey)
Number of strands – 2
Needle size – Small

Rabbit Eye
The tiny tricky bit here is figuring out where to place the eye. The placement and size really help give the rabbit its character!
Stitch – French Knot (with 2 wraps)
Thread colour – Anchor 360 (Dark Brown) (though I’m still not convinced I shouldn’t have used the grey 🤔 )
Number of strands – 2
Needle size – Small
Rabbit Tail
Now, for the very last bit to stitch - the tail! I almost went with Turkey Stitch here, but in the end, I decided to go with French Knots.
Stitch – French Knot (with 2 wraps)
Thread colour – Anchor 95 (Light Purple)
Number of strands – 3
Needle size – Middle
And that’s it!
The stitching for this rabbit and dandelion spring scene is all done! I absolutely love how it turned out (apart from that single layer of fabric issue 🙈).

5. Finishing and Displaying your Embroidery
You can frame your finished embroidery in the same hoop you used for stitching, which is one of my favourite ways to display my embroidery projects. To do this, trim away the excess fabric, leaving a few cm’s all the way around.
Next, stitch a running stitch about 1 cm from the fabric edge using 6 strands of thread, leaving unknotted tails at both the start and finish. Gently pull these tails to gather the fabric, then tie a knot to hold it in place.
I’ll show you how to do this in this video (it’s a Christmas one, sorry about that! 🙈 but the process is the same):
The best part about this method is that it’s not permanent! If you later decide to add more to your embroidery or change something, you can easily remove the running stitches and keep stitching until you’re happy with the design.
Then, step back and admire your beautiful stitching!

I hope you loved this project as much as I did!
I’m going to be stitching my way through all of my new embroidery designs (I’ve just launched 14 of them!) and will be adding similar blog posts like this one as I go. But of course, you can have fun stitching them before that! If you need a bit of guidance, the Panel Packs come with stitch suggestion sheets, and many of the elements from the blog posts I wrote for the hand-printed panels can still be applied to the new designs.
You can find them all here……….
And don’t forget to tag me on social media when you show off your beautiful work - I’d love to see it!

If you enjoyed this blog and would like to support my work, feel free to visit my Ko-fi and leave a tip - every little bit helps keep the creativity flowing! 🌸
Enjoy your stitching!
Until next time,
Liz x