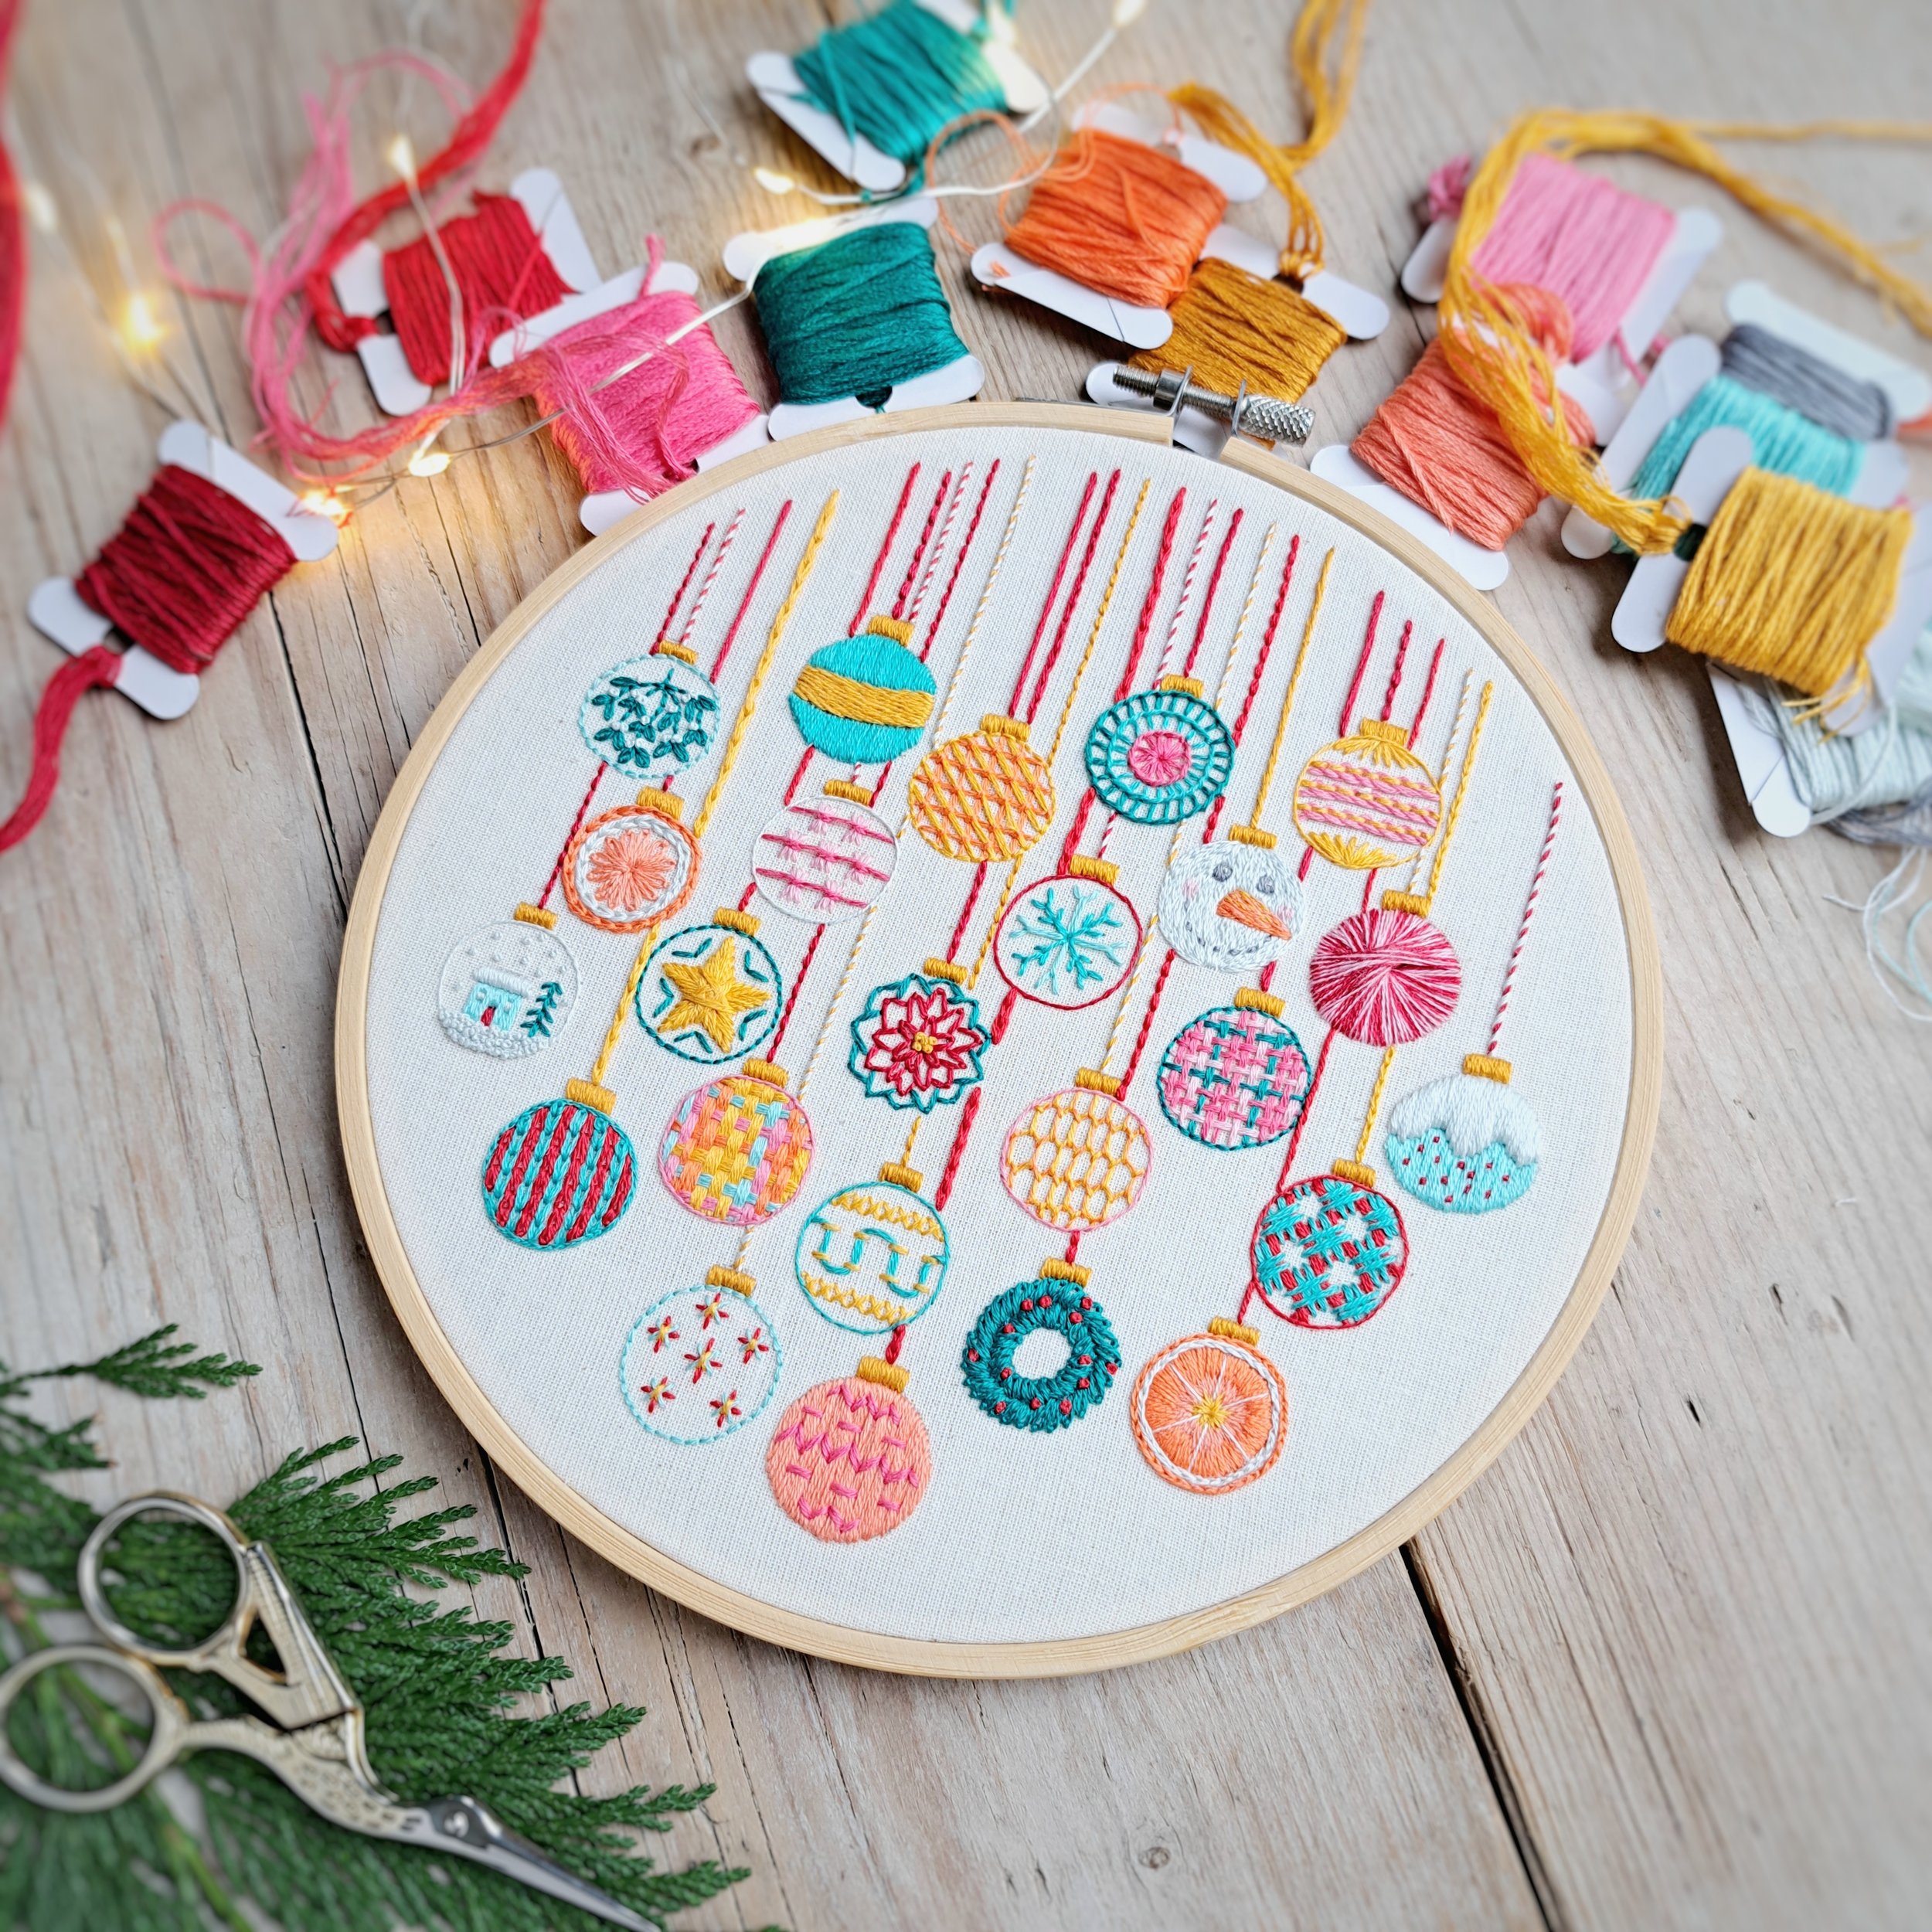
Bauble Advent Embroidery
Oh, what a fun way to countdown to Santa’s visit! 24 Christmas baubles to stitch.
This embroidery template is available for you to download and stitch too. All you need to do is print out the template, trace it onto your fabric, and then have fun stitching a bauble every day. You’ll be able to decorate the baubles using whichever stitches and thread colours you like! There are no rules! It’s all about having fun!

What’s included in the download:
- Black and white pattern templates to fit 5” and 7” hoops ready for printing and tracing (I’ll be stitching my own advent embroidery onto a 7” hoop).
- An illustrated Bauble ideas sheet with some of my bauble stitching ideas that I might try on my own hoop
- A doodling page with blank baubles for you to plan and sketch your own ideas before you stitch.
I’ll be trying to stitch each of my baubles differently and having fun trying out some new (to me) stitches. I'll be posting a video each day on my social media of my progress and will organise them into a highlight on my Instagram page.
But, you’ll also be able to find all of the video links right here in this blog post.
I will do my very best to upload the video links each day 😊 but bear with me if I get a couple of days behind 🧵
What you need
- A 5” or 7” Embroidery hoop (depending on which size template you decide to stitch)
- Fabric
- Embroidery threads
- Embroidery needles
- Fabric pen
- Scissors
If you are new to embroidery (a huge hello to you!), you may like my ‘Embroidery Starter Sets. They contain a thread set, embroidery needles, a 5” bamboo hoop, a stitch card with instructions for 12 different embroidery stitches, a square of calico fabric and a guide to get you started. You can find them here……
Getting started
Decide which sized hoop to stitch. 5” or 7”? I’m going to be stitching a 7” hoop because it’ll be easier to stitch some extra details if my baubles are bigger.
When printing the template, just make sure you scale the printing settings to 100%.
So how do you get this design onto your fabric? There are several tools and materials that can be used for transferring designs onto your fabric. But the one I like to use is the tracing method. Print out the black and white design and using a fabric pen trace the design over a lightbox or use a window if you don’t have a lightbox.
You can watch me doing this here……….
Once traced, you’re ready for the stitching.

A few tips for your Bauble Advent Embroidery
🧵 Pick a colour palette of threads. I've picked 13 colours but you can (of course) pick as many or few as you like. My advice would be to pick a minimum of 5. You don’t need to use all colours in every bauble, just pick 2 or 3 from your palette. It’ll really help with decision fatigue later down the line when you can pick threads from a pre decided range. And this is not set in stone, you can add in colours as you go, but this will be a great base to get going with.
🧵 Set a few ground rules. I've decided to stitch all of my strings in either red or yellow (they'll mostly be red, but I'll do a few yellow ones when I feel like it). I'm also going to stitch all of my bauble caps in the same colour and with the same stitch.
🧵 Do not worry about getting 'behind'. Some of my baubles will be fully covered with stitching and others will have a design where more of the fabric shows through..... it'll just depend on how much stitching I want to do on that particular day. And if I get behind? then I get behind. The most important thing is to remember why you're doing this. To enjoy the process, relax, and (for me) play with some new stitches.
And it may be that you’re finding this after the 1st December or maybe even next summer, then you are fully free to completely ignore the advent numbers and just have fun stitching completely at leisure.
🧵 Just start. The first bauble may be a little intimidating, and you may feel like you don't know what to start with. Just pick 2 colours from your palette and pick 1 stitch...... and stitch. You can't do it 'wrong', and the more baubles you stitch, the less you'll be looking at that first bauble. I promise!
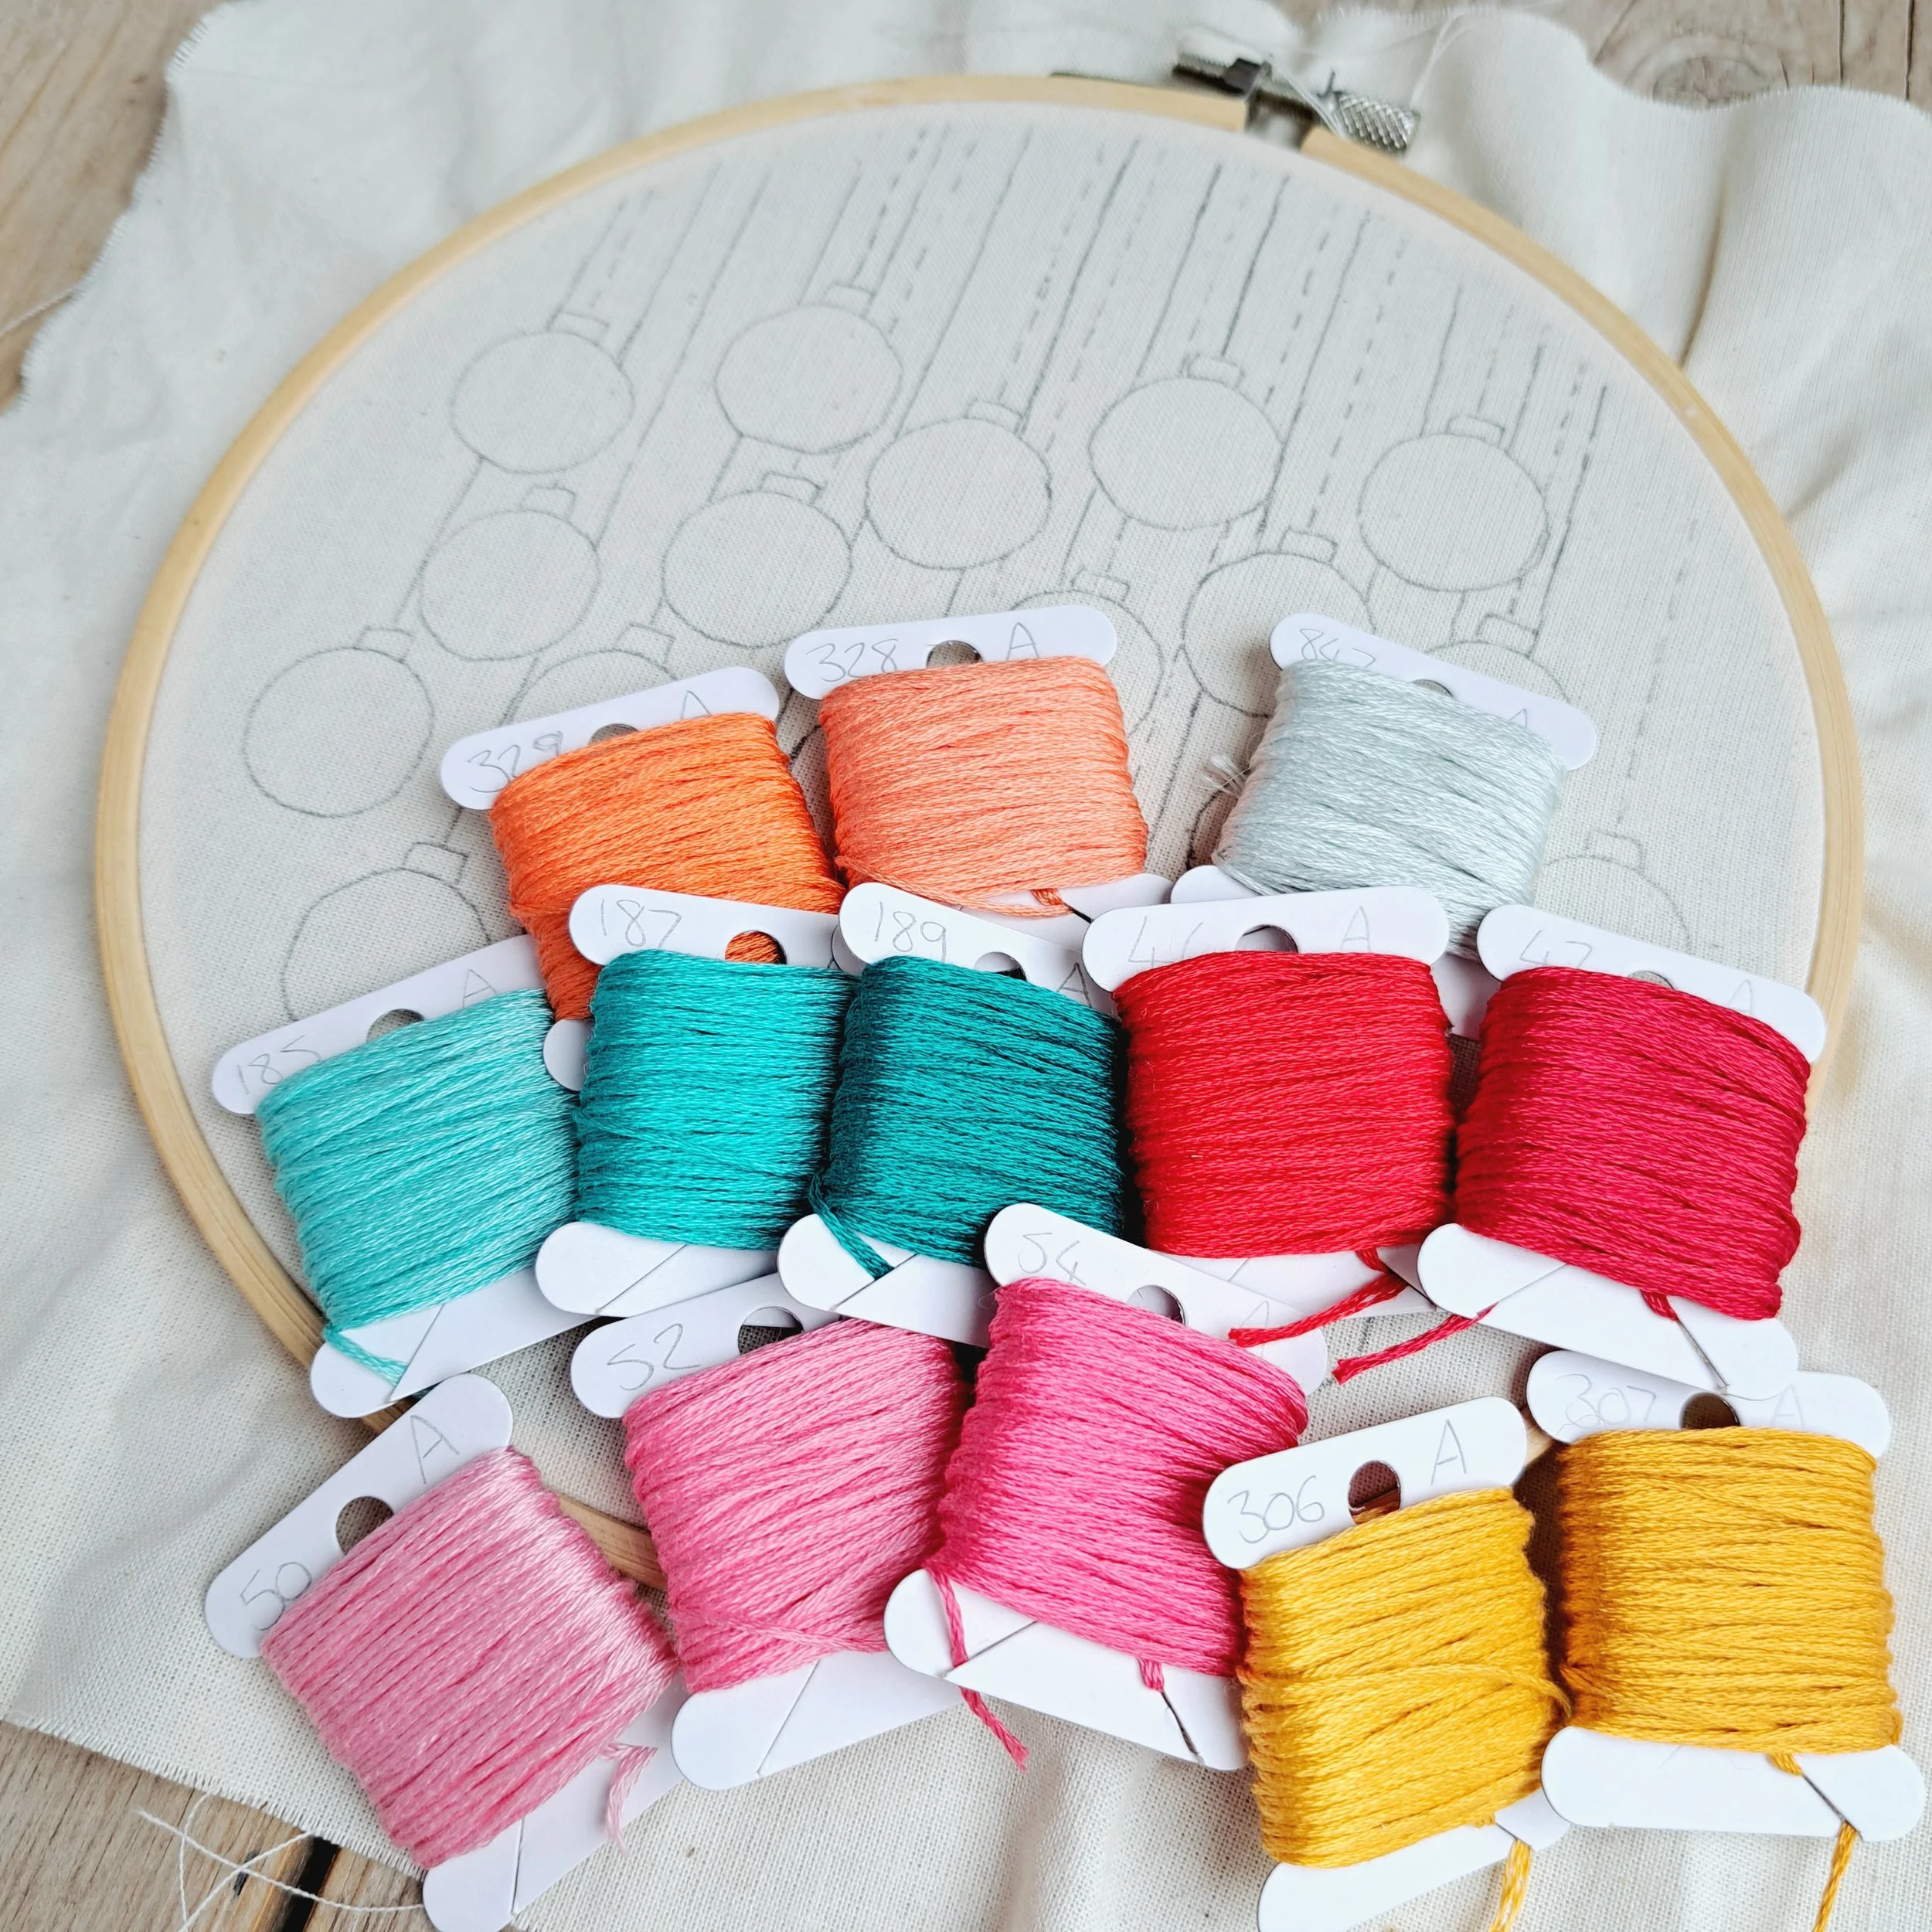
My Threads
I’m using Anchor embroidery threads for my stitching. I really love using this brand, they are a lovely quality and have a wonderful choice of colours. These are the ones I have chosen for my baubles…….
Reds - Anchor 46 and Anchor 47
Greens - Anchor 185, Anchor 187 & Anchor 189
Pinks - Anchor 50, Anchor 52 & Anchor 54
Yellow/gold – Anchor 306 & Anchor 307
Oranges – Anchor 328 & Anchor 329
Light Grey – Anchor 847
Dark Grey - Anchor 235 (I used just a little bit for Day 19)
Day 1
Eeeee! It's so exciting to get started with this fun countdown! I've kicked mine off by picking a couple of my 'go to' filling stitches.

Main bauble: Satin Stitch with 3 strands of Anchor 187
Band: Stem Stitch with 3 strands of Anchor 306
Cap: Satin Stitch with 3 strands of Anchor 307
String: Backstitch with 6 strands of Anchor 47
Day 2
I loved playing with this one. This is one of the stitches that I very rarely use. There are so many patterns that you could do! I went with 3 colours and made a repeating pattern.
The trickiest bit is getting the lines straight and even (ish) apart. Drawing some little markers on helped a bit but I found laying the thread across the surface to show me where to pop my needle down better.

Main bauble: Weave Stitch with 3 strands of Anchor 54, 50 & 189
Outline: Backstitch with 2 strands of Anchor 189
Cap: Satin Stitch with 3 strands of Anchor 307
String: Straight stitch with 6 strands of Anchor 47
Tip (if your tracing is dodgy like mine 🤭) - hold your thread on the surface to use as a guide for where to place the stitches.
Day 3
A cute little knitted bauble! Well, that’s the look I was going for anyway.🪡

Main bauble: Chain Stitch with 3 strands of Anchor 187 & 46
Outline: Split Stitch with 2 strands of Anchor 187
Cap: Satin Stitch with 3 strands of Anchor 307
String: Split stitch with 6 strands of Anchor 306
Day 4
Oh, this one is super cute! (Even if I do say so myself 😏). I love how this snowflake looks using 2 thread colours.

Main bauble: Fly Stitch with 3 strands. Horizontal and vertical parts of snowflake with Anchor 185. Diagonal parts of snowflake with Anchor 187
Outline: Stem Stitch with 1 strand of Anchor 47
Cap: Satin Stitch with 3 strands of Anchor 307
String: Whipped backstitch with 3 strands. Backstitches with Anchor 47. Whipped stitches with Anchor 847
Day 5
I love putting dried orange slices on my tree. I'm not fully convinced about this one though.... I think it looks more like a flower. But I still think it looks cute anyway. I might do another version of this on another bauble, maybe I can get it more orange like.

Orange peel: Chain stitch with 3 strands of Anchor 329
Orange pith: Chain stitch with 3 strands of Anchor 847
Orange segments: Lazy daisies with 3 strands of Anchor 328
Cap: Satin Stitch with 3 strands of Anchor 307
String: Straight stitch with 6 strands of Anchor 47
Day 6
This is one of the 'new to me' stitches that I wanted to try out. The Pekinese stitch. 🪡 I think it looks reeally pretty but I found it quite fiddly.....

Pekinese stitch rows: Backstitches with 3 strands of Anchor 306
Pekinese with 3 strands of Anchor 52
I did draw a few guidelines on for these.... just to keep my backstitches straight (ish).
Top and bottom sun rays: Straight stitches with 3 strands of Anchor 306
Outline: Stem stitch with 1 strand of Anchor 306
Cap: Satin Stitch with 3 strands of Anchor 307
String: Backstitch with 6 strands of Anchor 47
Day 7
Ooo a nice cheerful orange and pink bauble for today. I can't believe we're 7 baubles in already!

Main bauble: Satin stitch with 3 strands of Anchor 328
Markings: Straight stitch with 3 strands of Anchor 54
Cap: Satin Stitch with 3 strands of Anchor 307
String: Split stitch with 6 strands of Anchor 46

We're 7 baubles in already! I'm loving seeing my hoop fill day by day.
Day 8
Oh I love this one! I could do all 24 baubles this way 🤭
Originally I was going to stitch the pudding with French knots. I thought the texture would look really fun.....but it made the pudding all the same height and took away from the padding under the icing. So I cut it out, and changed to satin stitch which I think works sooo much better.

Icing: Padded Satin stitch
Padding - Chain stitch with 3 strands of Anchor 847
Overlying satin stitch with 6 strands of Anchor 847
Pudding: Satin stitch with 3 strands of Anchor 185
Berries: Couching with 3 strands of Anchor 47
Cap: Satin Stitch with 3 strands of Anchor 307
String: Whipped back stitch
Backstitches with 3 strands of Anchor 47
Whipping with 3 strands of Anchor 847
Day 9
This turned out so much better than I thought when I first started stitching it. Somehow I wasn't convinced it would fill in, but just keep going round and round and round ....it will fill in.

Star: Overlapping Herringbone Stitch with 3 strands of Anchor 306
Markings: Straight stitch with 3 strands of Anchor 189
Outline: Backstitch with 2 strands of Anchor 189
Cap: Satin Stitch with 2 strands of Anchor 307
String: Stem stitch with 3 strands of Anchor 46
Day 10
Another completely new stitch for me. I found it easier than the weaving, even though you have to do all those little couching stitches, it's not as fiddly.
My main tip is to get the base grid as even as you can. It'll really help with the diagonals, but you will be able to pull them over a bit with the Couching stitches.

Main bauble: Trellis Stitch
Vertical and horizontal straight stitches with 3 strands of Anchor 329
Diagonal straight stitches with 3 strands of Anchor 306
Couching (small diagonal straight stitches) with 3 strands of Anchor 329
Outline: Backstitches with 2 strands of Anchor 306
Cap: Satin Stitch with 3 strands of Anchor 307
String: Straight stitch with 6 strands of Anchor 47
Day 11
Oh this ones turned out really nice. The lazy daisies do get a bit squished in the middle circle, so I did over lap a few of them. Another option could be fly stitches for this one....might make a nice pine needle wreath.

Wreath leaves: Lazy daisies with 3 strands of Anchor 189
Berries: French knots with 2 wraps and 2 strands of Anchor 46
Cap: Satin Stitch with 3 strands of Anchor 307
String: Backstitch with 6 strands of Anchor 46
Day 12
A completely new to me stitch …… The Rhodes circle stitch. I found it harder than it looks and my first attempt was cut out half way around 😆
I used 4 strands the first time, but it was turning out too raised up for my liking. So I cut it out and went with 2 strands instead.
This one seems to use up quite a chunk of thread too. So on my second attempt I changed to a thread saver method, where I was coming up right next to where I was going down (I hope that makes sense). 🪡
Doesn't it make a lovely effect with the 2 colours? It reminds me of those sweets 🍬

Main bauble: Rhodes circle stitch with 2 strands. 1 strand of Anchor 50 combined with 1 strand of Anchor 47
Cap: Satin Stitch with 3 strands of Anchor 307
String: Whipped backstitch with 3 strands. Backstitches with Anchor 307. Whipped stitches with Anchor 847

Eeee half way through!
Day 13
Oh, now this might be my fave so far! A snow globe bauble.... you can't get much christmasier than that!

House: Satin stitch with 2 strands
House with Anchor 185
Door with Anchor 47
Roof and windows with Anchor 847
Tree: Fern stitch with 2 strands of 189
Snow on tree: Straight stitch with 1 strand of 847
Snow on ground: French knots with 2 wraps using 2 strands of 847
Falling snow: French knots with 1 wrap using 2 strands of 847
Outline: Stem stitch with 1 strand of 847
Cap: Satin Stitch with 3 strands of Anchor 307
String: Backstitch with 3 strands of 47
Day 14
This is a sweet little stitch. It's called the star filling stitch..... a nice find in my embroidery book.

Main bauble: Star filling stitch
The +'s with 2 strands of Anchor 46
The ×'s with 2 strands of Anchor 185
The top ×'s with 2 strands of Anchor 306
Outline: Backstitch with 2 strands of Anchor 185
Cap: Satin Stitch with 3 strands of Anchor 307
String: Whipped back stitch
Backstitches with 3 strands of Anchor 307
Whipping with 3 strands of Anchor 847
Day 15
I don't think I've ever used a blanket stitch as a filling stitch before.... Its quite fun to play with.🪡

Main bauble: Blanket Stitch with 3 strands
Outside ring with Anchor 189
Middle ring with Anchor 187
Inside ring with Anchor 54
Cap: Satin Stitch with 3 strands of Anchor 307
String: Stem stitch with 3 strands of Anchor 47
Day 16
Another new to me stitch ….. Plaid filling stitch. I love it! It's giving me tartan vibes.

Main bauble: Plaid filling stitch with 3 strands
Base grid with Anchor 46
Overlying straight stitches with Anchor 187
Outline: Stem Stitch with 1 strand of Anchor 46
Cap: Satin Stitch with 3 strands of Anchor 307
String: Split Stitch with 3 strands of Anchor 306
Day 17
I've never seen or even heard of this one before ..... have you? I saw it in my book and thought I'd give it a go. The butterfly chain stitch. Its very pretty and clever how it makes those little butterflies.

Main bauble: Butterfly chain stitch with 3 strands
Vertical straight stitches with Anchor 50
Chains with Anchor 54
Outline: Stem Stitch with 1 strand of Anchor 847
Cap: Satin Stitch with 3 strands of Anchor 307
String: Whipped back stitch
Backstitches with 3 strands of Anchor 46
Whipping with 3 strands of Anchor 847

7 Baubles and just 1 week until Christmas!
Day 18
Oooo I love this one. What a fun stitch! Quite simple, and I love the curvyness! It's another one from my book...... the Laced double running stitch.

Middle band: Laced double running stitch with 3 strands
Running stitches with Anchor 306
Weaving with Anchor 187
Top and bottom bands: Cross Stitches with 2 strand of Anchor 306
Outline: Stem Stitch with 1 strand of Anchor 187
Cap: Satin Stitch with 3 strands of Anchor 307
String: Backstitches with 3 strands of Anchor 307
Day 19
Frostie! Those little rosy cheeks 😍 such a fun little detail. It was tricky getting his eyes even (ish) but keeping to my 'look at arms length rule', I think he looks adorable.
Oh, and I did add a new colour for this one ( I can't believe I've got to bauble 19 without doing this), but it's only a little for Frosties eyes and mouth.... Anchor 235.

Snow: Split Stitch with 2 strands of Anchor 847
I curved these stitches to follow the curve of the bauble
Nose: Split Stitch with 2 strands
Bottom half with Anchor 329
Top half with Anchor 328
Nose highlights: Straight Stitch with 1 strand of Anchor 306
Eyes: Satin Stitch with 3 strands of Anchor 235
Mouth: Straight Stitches with 3 strands of Anchor 235
Eye highlights: Tiny couching Stitches with 2 strands of Anchor 847
Cheeks: Straight Stitches with 1 strand of Anchor 50
Cap: Satin Stitch with 3 strands of Anchor 307
String: Stem stitch with 3 strands of Anchor 307
Day 20
I wanted to have another play with this one after bauble 2...... but gosh! This one was a pain in the butt! The weaving was suuuper fiddly - I was catching on every pull through. I should of really put more of a space between my vertical stitches, I was basically trying to weave through Satin stitch. But it has made a nice dense fully covered weave. I stitched 2 rows of each weave too.
It's pretty though isn't it? It's so interesting how variations on one stitch can make such a different look.

Weave stitch with 3 strands:
🪡 Vertical stitches:
2 rows of Anchor 185
2 rows of Anchor 52
4 rows of Anchor 329
6 rows of Anchor 306
Repeated until bauble full
Horizontal weaving: Double rows of Anchor 185, 52, 329 & 306
Repeated until bauble full
Outline: Stem stitch with 1 strand of Anchor 52
Cap: Satin Stitch with 3 strands of Anchor 307
String: Backstitch with 3 strands of Anchor 47
Day 21
Take 2 of my orange slice bauble. I think this one looks more orangey than day 5. It's been fun playing with stitching the 2 different styles though.

Peel: Split stitch with 2 strands of Anchor 329
Pith: Split stitch with 2 strands of Anchor 847
The juicy parts: Split stitch with 2 strands
Center with Anchor 306
Middle with Anchor 328
Outer with Anchor 329
Segments: Straight stitch with 1 strand of Anchor 847
Cap: Satin Stitch with 3 strands of Anchor 307
String: Stem stitch with 2 strands of Anchor 46
Day 22
A cute poinsettia! I actually avoid these as I can never keep them alive, but aren't they pretty to look at?

Leaves: Fly stitch with 3 strands
Red leaves with Anchor 47
Green leaves with Anchor 189
Flower: French knots with 2 strands and 2 wraps using Anchor 306
Cap: Satin Stitch with 3 strands of Anchor 307
String: Split Stitch with 3 strands of Anchor 47
Just 2 Baubles to go! 🎄🎅
Day 23
It's Christmas eve eve and I've got the penultimate bauble for you. A cute delicate bunch of mistletoe.

Branches: Backstitch with 2 strands of Anchor 189
Leaves: Lazy daisies with 2 strands of Anchor 189
Berries: French knots with 2 strands and 2 wraps using Anchor 847
Outline: Backstitch with 2 strands of Anchor 185
Cap: Satin Stitch with 3 strands of Anchor 307
String: Whipped backstitch with 3 strands
Backstitches with Anchor 46
Whipping with Anchor 847
Just one to go..... 🎅🎄
Day 24
The final bauble! I'm using my last bauble for one more 'new to me' stitch. The honeycomb filling stitch.

Main bauble: Honeycomb filling stitch with 3 strands; 2 strands of Anchor 306 combined with 1 strand of Anchor 329
Outline: Stem stitch with 1 strand of Anchor 52
Cap: Satin Stitch with 3 strands of Anchor 307
String: Whipped backstitch with 3 strands
Backstitches with Anchor 306
Whipping with Anchor 847
And that's it! All the baubles have been stitched! All that's left to do is to finish off the hoop ready for displaying.
Display your finished embroidery
You can frame your finished piece in the very hoop you stitched it in. If your project isn’t central in your hoop, now is the time to take it out and reposition it. And don’t forget, if you used the Frixon Pilot pen (like I did) to ttrace your baubles, give your embroidery a little hair dry to remove any pen that hasn’t been covered with stitching.
Trim away excess fabric from the edges of the hoop, leaving a ring about 4cm all the way around. Stitch a running stitch about 1cm in from the fabric edge, leaving an unknotted tail at the start and finish. Pull these two tails to gather in the fabric. Tie a knot to hold in place.
Take a look at this little video to see how I do this bit…
Now all that is left, is to stand back and admire your beautiful baubles.
I really enjoyed stitching mine, I hope you did too! I thought that was good fun. I stitched a good mix of christmassy baubles with baubles that used stitches I'd never tried before .... and some I'd never heard of before. Some I liked more than others, but I loved having a play with them all.
Please do share how you've got on with yours ..... I really do love to see them 🥰 and Meeerrrry Christmas! 🎄🎅


If you enjoyed this blog and would like to support my work, feel free to visit my Ko-fi page and leave a tip—every little bit helps keep the creativity flowing! 🌸
Until next time,
Liz x